Paid Social for Content Marketing Launches – Whiteboard Friday

Posted by KaneJamison

Stuck in a content marketing rut? Relying on your existing newsletter, social followers, or email outreach won’t do your launches justice. Boosting your signal with paid social both introduces your brand to new audiences and improves your launch’s traffic and results. In today’s Whiteboard Friday, we’re welcoming back our good friend Kane Jamison to highlight four straightforward, actionable tactics you can start using ASAP.

http://ift.tt/2x0qDOL

http://ift.tt/1SsY8tZ

Paid social for content marketing launches

Click on the whiteboard image above to open a high-resolution version in a new tab!

http://ift.tt/2fwfs5n


Video Transcription

Howdy, Moz fans. My name is Kane. I’m the founder of a content marketing agency here in Seattle called Content Harmony, and we do a lot of content marketing projects where we use paid social to launch them and get better traffic and results.

So I spoke about this, this past year at MozCon, and what I want to do today is share some of those tactics with you and help you get started with launching your content with some paid traction and not just relying on your email outreach or maybe your own existing email newsletter and social followers.

Especially for a lot of companies that are just getting started with content marketing, that audience development component is really important. A lot of people just don’t have a significant market share of their industry subscribed to their newsletter. So it’s great to use paid social in order to reach new people, get them over to your most important content projects, or even just get them over to your week-to-week blog content.

Social teaser content

So the first thing I want to start with is expanding a little bit beyond just your average image ad. A lot of social networks, especially Facebook, are promoting video heavily nowadays. You can use that to get a lot cheaper engagement than you can from a typical image ad. If you’ve logged in to your Facebook feed lately, you’ve probably noticed that aside from birth announcements, there’s a lot of videos filling up the feed. So as an advertiser, if you want to blend in well with that, using video as a teaser or a sampler for the content that you’re producing is a great way to kind of look natural and look like you belong in the user’s feed.

So different things you can do include:

  • Short animated videos explaining what the project is and why you did it.
  • Maybe doing talking head videos with some of your executives or staff or marketing team, just talking on screen with whatever in the background about the project you created and kind of drumming up interest to actually get people over to the site.

So that can be really great for team recognition if you’re trying to build thought leadership in your space. It’s a great way to introduce the face of your team members that might be speaking at industry conferences and events. It’s a great way to just get people recognizing their name or maybe just help them feel closer to your company because they recognize their voice and face.

So everybody’s instant reaction, of course, is, “I don’t have the budget for video.” That’s okay. You don’t need to be a videography expert to create decent social ads. There’s a lot of great tools out there.

  • Soapbox by Wistia is a great one, that’s been released recently, that allows you to do kind of a webcam combined with your browser type of video. There are also tools like…
  • Bigvu.tv
  • Shakr
  • Promo, which is a tool by a company called Slidely, I think.

All of those tools are great ways to create short, 20-second, 60-second types of videos. They let you create captions. So if you’re scrolling through a social feed and you see an autoplay video, there’s a good chance that the audio on that is turned off, so you can create captions to let people know what the video is about if it’s not instantly obvious from the video itself. So that’s a great way to get cheaper distribution than you might get from your typical image ad, and it’s really going to stick out to users because most other companies aren’t spending the time to do that.

Lookalike audiences

Another really valuable tactic is to create lookalike audiences from your best customers. Now, you can track your best customers in a couple of ways:

  • You could have a pixel, a Facebook pixel or another network pixel on your website that just tracks the people that have been to the site a number of times or that have been through the shopping cart at a certain dollar value.
  • We can take our email list and use the emails of customers that have ordered from us or just the emails of customers that are on our newsletter that seem like they open up every newsletter and they really like our content.

We can upload those into a custom audience in the social network of our choice and then create what’s called a lookalike audience. In this case, I’d recommend what’s called a “one percent lookalike audience.” So if you’re targeting people in the US, it means the one percent of people in the US that appear most like your audience. So if your audience is men ages 35 to 45, typically that are interested in a specific topic, the lookalike audience will probably be a lot of other men in a similar age group that like similar topics.

So Facebook is making that choice, which means you may or may not get the perfect audience right from the start. So it’s great to test additional filters on top of the default lookalike audience. So, for example, you could target people by household income. You could target people by additional interests that may or may not be obvious from the custom audience, just to make sure you’re only reaching the users that are interested in your topic. Whatever it might be, if this is going to end up being three or four million people at one percent of the country, it’s probably good to go ahead and filter that down to a smaller audience that’s a little bit closer to your exact target that you want to reach. So excellent way to create brand awareness with that target audience.

Influencers

The next thing I’d like you to test is getting your ads and your content in front of influencers in your space. That could mean…

  • Bloggers
  • Journalists
  • Or it could just mean people like page managers in Facebook, people that have access to a Facebook page that can share updates. Those could be social media managers. That could be bloggers. That could even be somebody running the page for the local church or a PTA group. Regardless, those people are probably going to have a lot of contacts, be likely to share things with friends and family or followers on social media.

Higher cost but embedded value

When you start running ads to this type of group, you’re going to find that it costs a little bit more per click. If you’re used to paying $0.50 to $1.00 per click, you might end up paying $1.00 or $2.00 per click to reach this audience. That’s okay. There’s a lot more embedded value with this audience than the typical user, because they’re likely, on average, to have more reach, more followers, more influence.

Test share-focused CTAs

It’s worth testing share focus call to actions. What that means is encouraging people to share this with some people they know that might be interested. Post it to their page even is something worth testing. It may or may not work every time, but certainly valuable to test.

Filters

So the way we recommend reaching most of these users is through something like a job title filter. Somebody says they’re a blogger, says they’re an editor-in-chief, that’s the clearest way to reach them. They may not always have that as their job title, so you could also do employers. That’s another good example.

I recommend combining that with broad interests. So if I am targeting journalists because I have a new research piece out, it’s great for us to attach interests that are relevant to our space. If we’re in health care, we might target people interested in health care and the FDA and other big companies in the space that they’d likely be following for updates. If we’re in fashion, we might just be selecting people that are fans of big brands, Nordstrom and others like that. Whatever it is, you can take this audience of a few hundred thousand or whatever it might be down to just a few thousand and really focus on the people that are most likely to be writing about or influential in your space.

Retarget non-subscribers

The fourth thing you can test is retargeting non-subscribers. So a big goal of content marketing is having those pop-ups or call to actions on the site to get people to download a bigger piece of content, download a checklist, whatever it might be so that we can get them on our email newsletter. There’s a lot of people that are going to click out of that. 90% to 95% of the people that visit your site or more probably aren’t going to take that call to action.

So what we can do is convert this into more of a social ad unit and just show the same messaging to the people that didn’t sign up on the site. Maybe they just hate pop-ups by default. They will never sign up for them. That’s okay. They might be more receptive to a lead ad in Facebook that says “subscribe” or “download” instead of something that pops up on their screen.

Keep testing new messaging

The other thing we can do is start testing new messages and new content. Maybe this offer wasn’t interesting to them because they don’t need that guide, but maybe they need your checklist instead, or maybe they’d just like your email drip series that has an educational component to it. So keep testing different types of messaging. Just because this one wasn’t valuable doesn’t mean your other content isn’t interesting to them, and it doesn’t mean they’re not interested in your email list.

Redo split tests from your site

We can keep testing messaging. So if we are testing messaging on our site, we might take the top two or three and test that messaging on ads. We might find that different messaging works better on social than it does on pop-ups or banners on the site. So it’s worth redoing split tests that seemed conclusive on your site because things might be different on the social media network.


So that’s it for today. What I’d love for you guys to do is if you have some great examples of targeting that’s worked for you, messaging that’s worked for you, or just other paid social tactics that have worked really well for your content marketing campaigns, I’d love to hear examples of that in the comments on the post, and we’d be happy to answer questions you guys have on how to actually get some of this stuff done. Whether it’s targeting questions, how to set up lookalike audiences, anything like that, we’d be happy to answer questions there as well.

So that’s it for me today. Thanks, Moz fans. We’ll see you next time.

Video transcription by Speechpad.com

Sign up for The Moz Top 10, a semimonthly mailer updating you on the top ten hottest pieces of SEO news, tips, and rad links uncovered by the Moz team. Think of it as your exclusive digest of stuff you don’t have time to hunt down but want to read!

How to Track Your Local SEO & SEM

Posted by nickpierno

If you asked me, I’d tell you that proper tracking is the single most important element in your local business digital marketing stack. I’d also tell you that even if you didn’t ask, apparently.

A decent tracking setup allows you to answer the most important questions about your marketing efforts. What’s working and what isn’t?

Many digital marketing strategies today still focus on traffic. Lots of agencies/developers/marketers will slap an Analytics tracking code on your site and call it a day. For most local businesses, though, traffic isn’t all that meaningful of a metric. And in many cases (e.g. Adwords & Facebook), more traffic just means more spending, without any real relationship to results.

What you really need your tracking setup to tell you is how many leads (AKA conversions) you’re getting, and from where. It also needs to do so quickly and easily, without you having to log into multiple accounts to piece everything together.

If you’re spending money or energy on SEO, Adwords, Facebook, or any other kind of digital traffic stream and you’re not measuring how many leads you get from each source, stop what you’re doing right now and make setting up a solid tracking plan your next priority.

This guide is intended to fill you in on all the basic elements you’ll need to assemble a simple, yet flexible and robust tracking setup.

Google Analytics

Google Analytics is at the center of virtually every good web tracking setup. There are other supplemental ways to collect web analytics (like Heap, Hotjar, Facebook Pixels, etc), but Google Analytics is the free, powerful, and omnipresent tool that virtually every website should use. It will be the foundation of our approach in this guide.

Analytics setup tips

Analytics is super easy to set up. Create (or sign into) a Google account, add your Account and Property (website), and install the tracking code in your website’s template.

Whatever happens, don’t let your agency or developer set up your Analytics property on their own Account. Agencies and developers: STOP DOING THIS! Create a separate Google/Gmail account and let this be the “owner” of a new Analytics Account, then share permission with the agency/developer’s account, the client’s personal Google account, and so on.

The “All Website Data” view will be created by default for a new property. If you’re going to add filters or make any other advanced changes, be sure to create and use a separate View, keeping the default view clean and pure.

Also be sure to set the appropriate currency and time zone in the “View Settings.” If you ever use Adwords, using the wrong currency setting will result in a major disagreement between Adwords and Analytics.

Goals

Once your basic Analytics setup is in place, you should add some goals. This is where the magic happens. Ideally, every business objective your website can achieve should be represented as a goal conversion. Conversions can come in many forms, but here are some of the most common ones:

  • Contact form submission
  • Quote request form submission
  • Phone call
  • Text message
  • Chat
  • Appointment booking
  • Newsletter signup
  • E-commerce purchase

How you slice up your goals will vary with your needs, but I generally try to group similar “types” of conversions into a single goal. If I have several different contact forms on a site (like a quick contact form in the sidebar, and a heftier one on the contact page), I might group those as a single goal. You can always dig deeper to see the specific breakdown, but it’s nice to keep goals as neat and tidy as possible.

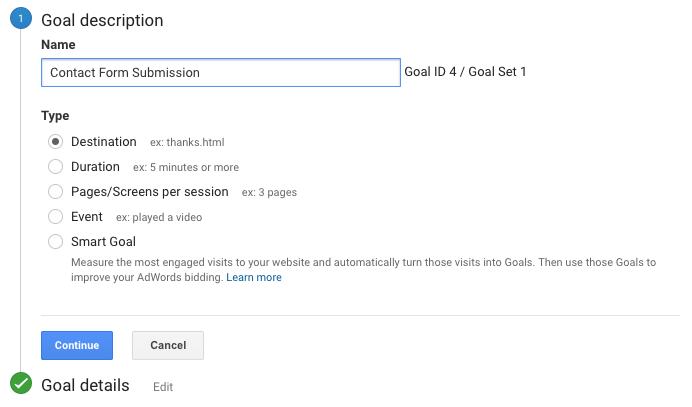
To create a goal in Analytics:

  1. Navigate to the Admin screen.
  2. Under the appropriate View, select Goals and then + New Goal.
  3. You can either choose between a goal Template, or Custom. Most goals are easiest to set up choosing Custom.
  4. Give your goal a name (ex. Contact Form Submission) and choose a type. Most goals for local businesses will either be a Destination or an Event.

Pro tip: Analytics allows you to associate a dollar value to your goal conversions. If you can tie your goals to their actual value, it can be a powerful metric to measure performance with. A common way to determine the value of a goal is to take the average value of a sale and multiply it by the average closing rate of Internet leads. For example, if your average sale is worth $1,000, and you typically close 1/10 of leads, your goal value would be $100.

Form tracking

The simplest way to track form fills is to have the form redirect to a “Thank You” page upon submission. This is usually my preferred setup; it’s easy to configure, and I can use the Thank You page to recommend other services, articles, etc. on the site and potentially keep the user around. I also find a dedicated Thank You page to provide the best affirmation that the form submission actually went through.

Different forms can all use the same Thank You page, and pass along variables in the URL to distinguish themselves from each other so you don’t have to create a hundred different Thank You pages to track different forms or goals. Most decent form plugins for WordPress are capable of this. My favorite is Gravityforms. Contact Form 7 and Ninja Forms are also very popular (and free).

Another option is using event tracking. Event tracking allows you to track the click of a button or link (the submit button, in the case of a web form). This would circumvent the need for a thank you page if you don’t want to (or can’t) send the user elsewhere when they submit a form. It’s also handy for other, more advanced forms of tracking.

Here’s a handy plugin for Gravityforms that makes setting up event tracking a snap.

Once you’ve got your form redirecting to a Thank You page or generating an event, you just need to create a goal in Analytics with the corresponding value.

You can use Thank You pages or events in a similar manner to track appointment booking, web chats, newsletter signups, etc.

Call tracking

Many businesses and marketers have adopted form tracking, since it’s easy and free. That’s great. But for most businesses, it leaves a huge volume of web conversions untracked.

If you’re spending cash to generate traffic to your site, you could be hemorrhaging budget if you’re not collecting and attributing the phone call conversions from your website.

There are several solutions and approaches to call tracking. I use and recommend CallRail, which also seems to have emerged as the darling of the digital marketing community over the past few years thanks to its ease of use, great support, fair pricing, and focus on integration. Another option (so I don’t come across as completely biased) is CallTrackingMetrics.

You’ll want to make sure your call tracking platform allows for integration with Google Analytics and offers something called “dynamic number insertion.”

Dynamic number insertion uses JavaScript to detect your actual local phone number on your website and replace it with a tracking number when a user loads your page.

Dynamic insertion is especially important in the context of local SEO, since it allows you to keep your real, local number on your site, and maintain NAP consistency with the rest of your business’s citations. Assuming it’s implemented properly, Google will still see your real number when it crawls your site, but users will get a tracked number.

Basically, magic.

There are a few ways to implement dynamic number insertion. For most businesses, one of these two approaches should fit the bill.

Number per source

With this approach, you’ll create a tracking number for each source you wish to track calls for. These sources might be:

  • Organic search traffic
  • Paid search traffic
  • Facebook referral traffic
  • Yelp referral traffic
  • Direct traffic
  • Vanity URL traffic (for visitors coming from an offline TV or radio ad, for example)

When someone arrives at your website from one of these predefined sources, the corresponding number will show in place of your real number, wherever it’s visible. If someone calls that number, an event will be passed to Analytics along with the source.

This approach isn’t perfect, but it’s a solid solution if your site gets large amounts of traffic (5k+ visits/day) and you want to keep call tracking costs low. It will do a solid job of answering the basic questions of how many calls your site generates and where they came from, but it comes with a few minor caveats:

  • Calls originating from sources you didn’t predefine will be missed.
  • Events sent to Analytics will create artificial sessions not tied to actual user sessions.
  • Call conversions coming from Adwords clicks won’t be attached to campaigns, ad groups, or keywords.

Some of these issues have more advanced workarounds. None of them are deal breakers… but you can avoid them completely with number pools — the awesomest call tracking method.

Number pools

“Keyword Pools,” as CallRail refers to them, are the killer app for call tracking. As long as your traffic doesn’t make this option prohibitively expensive (which won’t be a problem for most local business websites), this is the way to go.

In this approach, you create a pool with several numbers (8+ with CallRail). Each concurrent visitor on your site is assigned a different number, and if they call it, the conversion is attached to their session in Analytics, as well as their click in Adwords (if applicable). No more artificial sessions or disconnected conversions, and as long as you have enough numbers in your pool to cover your site’s traffic, you’ll capture all calls from your site, regardless of source. It’s also much quicker to set up than a number per source, and will even make you more attractive and better at sports!

You generally have to pay your call tracking provider for additional numbers, and you’ll need a number for each concurrent visitor to keep things running smoothly, so this is where massive amounts of traffic can start to get expensive. CallRail recommends you look at your average hourly traffic during peak times and include ¼ the tally as numbers in your pool. So if you have 30 visitors per hour on average, you might want ~8 numbers.

Implementation

Once you’ve got your call tracking platform configured, you’ll need to implement some code on your site to allow the dynamic number insertion to work its magic. Most platforms will provide you with a code snippet and instructions for installation. If you use CallRail and WordPress, there’s a handy plugin to make things even simpler. Just install, connect, and go.

To get your calls recorded in Analytics, you’ll just need to enable that option from your call tracking service. With CallRail you simply enable the integration, add your domain, and calls will be sent to your Analytics account as Events. Just like with your form submissions, you can add these events as a goal. Usually it makes sense to add a single goal called “Phone Calls” and set your event conditions according to the output from your call tracking service. If you’re using CallRail, it will look like this:

Google Search Console

It’s easy to forget to set up Search Console (formerly Webmaster Tools), because most of the time it plays a backseat role in your digital marketing measurement. But miss it, and you’ll forego some fundamental technical SEO basics (country setting, XML sitemaps, robots.txt verification, crawl reports, etc.), and you’ll miss out on some handy keyword click data in the Search Analytics section. Search Console data can also be indispensable for diagnosing penalties and other problems down the road, should they ever pop up.

Make sure to connect your Search Console with your Analytics property, as well as your Adwords account.

With all the basics of your tracking setup in place, the next step is to bring your paid advertising data into the mix.

Google Adwords

Adwords is probably the single most convincing reason to get proper tracking in place. Without it, you can spend a lot of money on clicks without really knowing what you get out of it. Conversion data in Adwords is also absolutely critical in making informed optimizations to your campaign settings, ad text, keywords, and so on.

If you’d like some more of my rantings on conversions in Adwords and some other ways to get more out of your campaigns, check out this recent article 🙂

Getting your data flowing in all the right directions is simple, but often overlooked.

Linking with Analytics

First, make sure your Adwords and Analytics accounts are linked. Always make sure you have auto-tagging enabled on your Adwords account. Now all your Adwords data will show up in the Acquisition > Adwords area of Analytics. This is a good time to double-check that you have the currency correctly set in Analytics (Admin > View Settings); otherwise, your Adwords spend will be converted to the currency set in Analytics and record the wrong dollar values (and you can’t change data that’s already been imported).

Next, you’ll want to get those call and form conversions from Analytics into Adwords.

Importing conversions in Adwords

Some Adwords management companies/consultants might disagree, but I strongly advocate an Analytics-first approach to conversion tracking. You can get call and form conversions pulled directly into Adwords by installing a tracking code on your site. But don’t.

Instead, make sure all your conversions are set up as goals in Analytics, and then import them into Adwords. This allows Analytics to act as your one-stop-shop for reviewing your conversion data, while providing all the same access to that data inside Adwords.

Call extensions & call-only ads

This can throw some folks off. You will want to track call extensions natively within Adwords. These conversions are set up automatically when you create a call extension in Adwords and elect to use a Google call forwarding number with the default settings.

Don’t worry though, you can still get these conversions tracked in Analytics if you want to (I could make an argument either for or against). Simply create a single “offline” tracking number in your call tracking platform, and use that number as the destination for the Google forwarding number.

This also helps counteract one of the oddities of Google’s call forwarding system. Google will actually only start showing the forwarding number on desktop ads after they have received a certain (seemingly arbitrary) minimum number of clicks per week. As a result, some calls are tracked and some aren’t — especially on smaller campaigns. With this little trick, Analytics will show all the calls originating from your ads — not just ones that take place once you’ve paid Google enough each week.

Adwords might give you a hard time for using a number in your call extensions that isn’t on your website. If you encounter issues with getting your number verified for use as a call extension, just make sure you have linked your Search Console to your Adwords account (as indicated above).

Now you’ve got Analytics and Adwords all synced up, and your tracking regimen is looking pretty gnarly! There are a few other cool tools you can use to take full advantage of your sweet setup.

Google Tag Manager

If you’re finding yourself putting a lot of code snippets on your site (web chat, Analytics, call tracking, Adwords, Facebook Pixels, etc), Google Tag Manager is a fantastic tool for managing them all from one spot. You can also do all sorts of advanced slicing and dicing.

GTM is basically a container that you put all your snippets in, and then you put a single GTM snippet on your site. Once installed, you never need to go back to your site’s code to make changes to your snippets. You can manage them all from the GTM interface in a user-friendly, version-controlled environment.

Don’t bother if you just need Analytics on your site (and are using the CallRail plugin). But for more robust needs, it’s well worth considering for its sheer power and simplicity.

Here’s a great primer on making use of Google Tag Manager.

UTM tracking URLs & Google Campaign URL Builder

Once you’ve got conversion data occupying all your waking thoughts, you might want to take things a step further. Perhaps you want to track traffic and leads that come from an offline advertisement, a business card, an email signature, etc. You can build tracking URLs that include UTM parameters (campaign, source, and medium), so that when visitors come to your site from a certain place, you can tell where that place was!

Once you know how to build these URLs, you don’t really need a tool, but Google’s Campaign URL Builder makes quick enough work of it that it’s bound to earn a spot in your browser’s bookmarks bar.

Pro tip: Use a tracking URL on your Google My Business listing to help distinguish traffic/conversions coming in from your listing vs traffic coming in from the organic search results. I’d recommend using:

Source: google
Medium: organic
Campaign name: gmb-listing (or something)

This way your GMB traffic still shows up in Analytics as normal organic traffic, but you can drill down to the gmb-listing campaign to see its specific performance.

Bonus pro tip: Use a vanity domain or a short URL on print materials or offline ads, and point it to a tracking URL to measure their performance in Analytics.

Rank tracking

Whaaat? Rank tracking is a dirty word to conversion tracking purists, isn’t it?

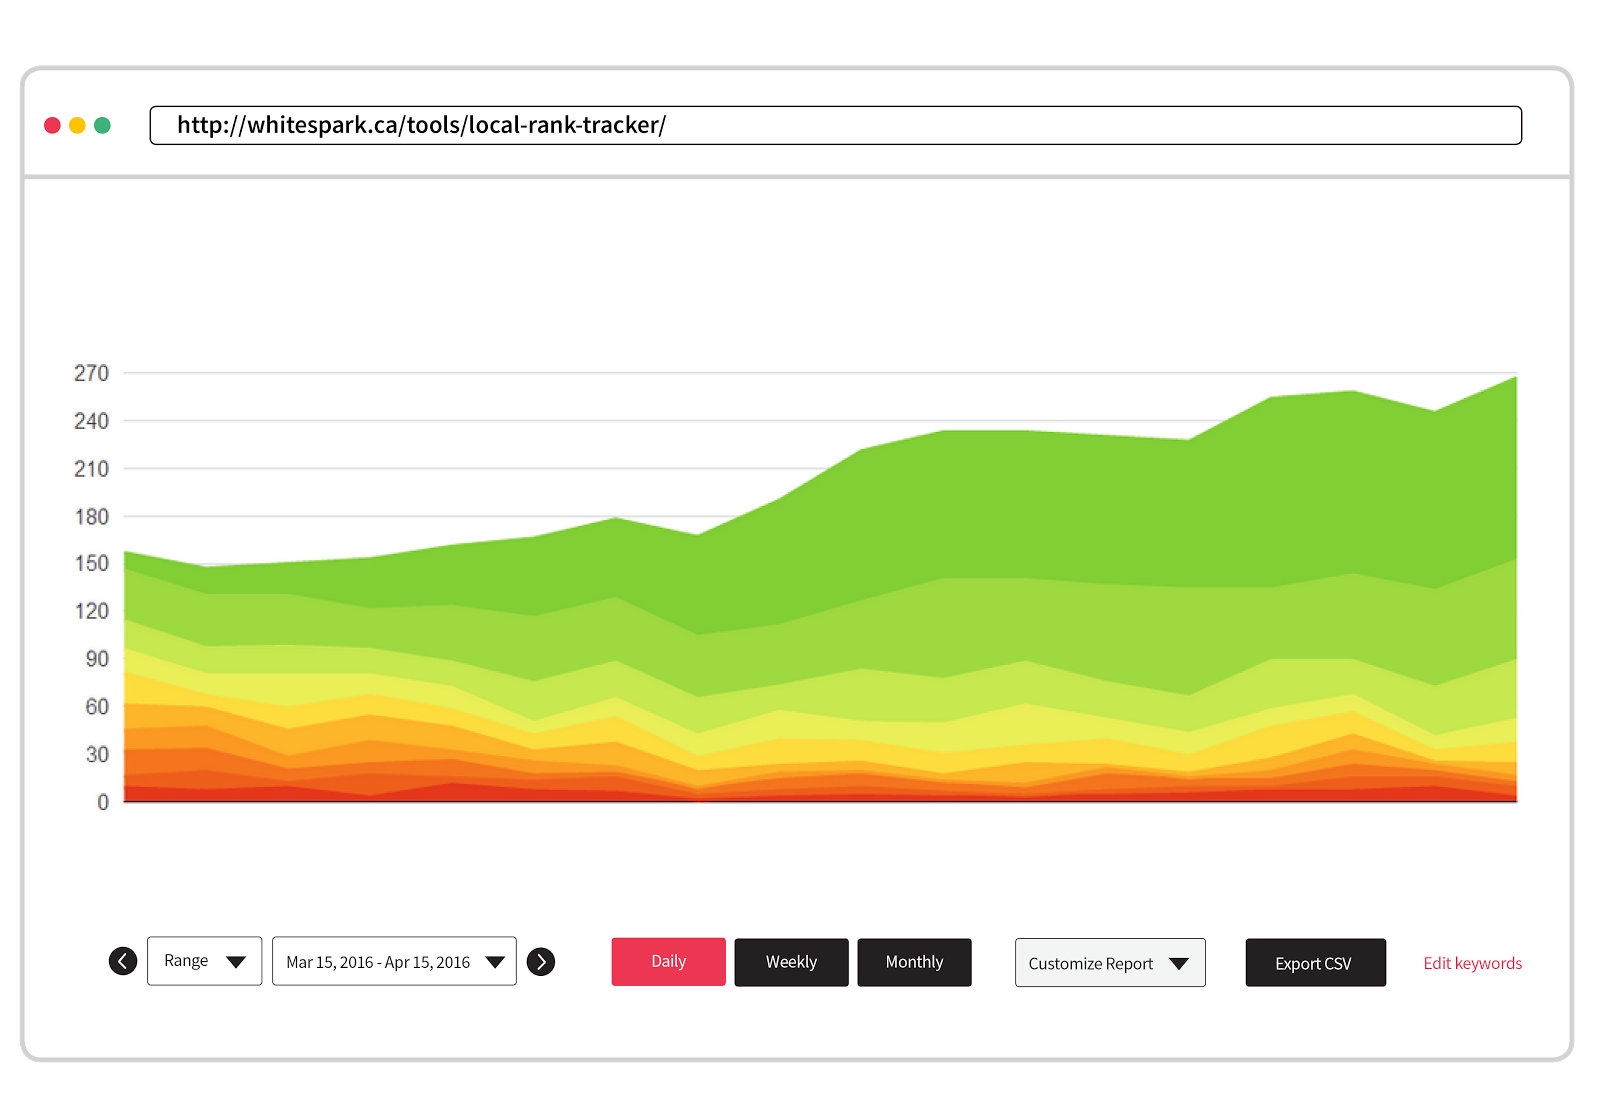
Nah. It’s true that rank tracking is a poor primary metric for your digital marketing efforts, but it can be very helpful as a supplemental metric and for helping to diagnose changes in traffic, as Darren Shaw explored here.

For local businesses, we think our Local Rank Tracker is a pretty darn good tool for the job.

Google My Business Insights

Your GMB listing is a foundational piece of your local SEO infrastructure, and GMB Insights offer some meaningful data (impressions and clicks for your listing, mostly). It also tries to tell you how many calls your listing generates for you, but it comes up a bit short since it relies on “tel:” links instead of tracking numbers. It will tell you how many people clicked on your phone number, but not how many actually made the call. It also won’t give you any insights into calls coming from desktop users.

There’s a great workaround though! It just might freak you out a bit…

Fire up your call tracking platform once more, create an “offline” number, and use it as your “primary number” on your GMB listing. Don’t panic. You can preserve your NAP consistency by demoting your real local number to an “additional number” slot on your GMB listing.

I don’t consider this a necessary step, because you’re probably not pointing your paid clicks to your GMB listing. However, combined with a tracking URL pointing to your website, you can now fully measure the performance of Google My Business for your business!

Disclaimer: I believe that this method is totally safe, and I’m using it myself in several instances, but I can’t say with absolute certainty that it won’t impact your rankings. Whitespark is currently testing this out on a larger scale, and we’ll share our findings once they’re assembled!

Taking it all in

So now you’ve assembled a lean, mean tracking machine. You’re already feeling 10 years younger, and everyone pays attention when you enter the room. But what can you do with all this power?

Here are a few ways I like to soak up this beautiful data.

Pop into Analytics

Since we’ve centralized all our tracking in Analytics, we can answer pretty much any performance questions we have within a few simple clicks.

  • How many calls and form fills did we get last month from our organic rankings?
  • How does that compare to the month before? Last year?
  • How many paid conversions are we getting? How much are we paying on average for them?
  • Are we doing anything expensive that isn’t generating many leads?
  • Does our Facebook page generate any leads on our website?

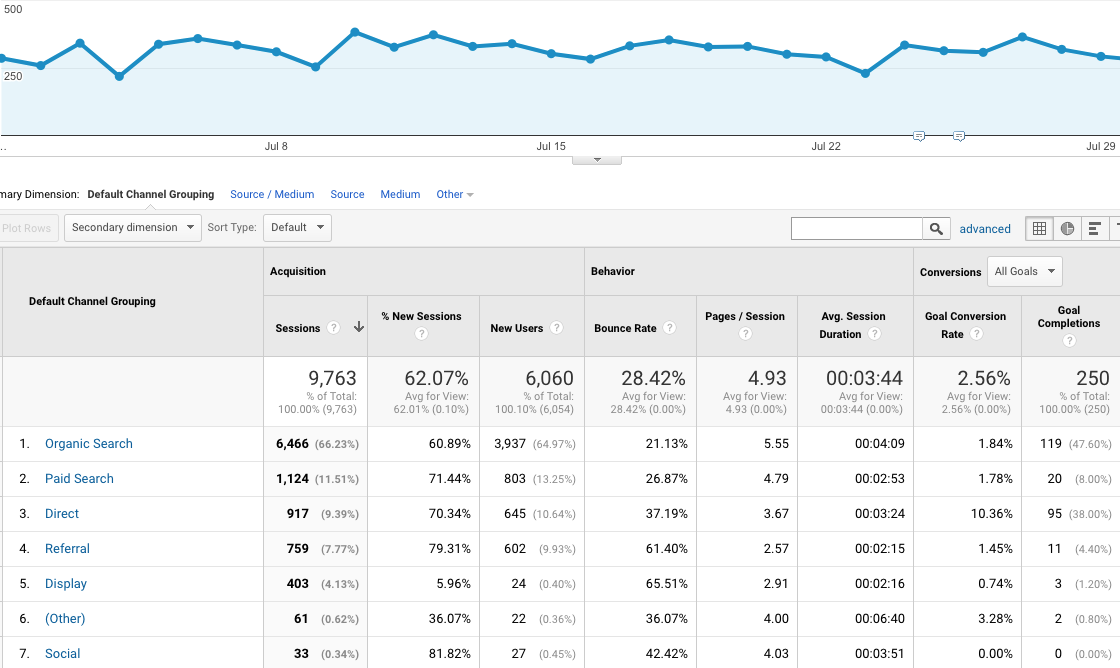
There are a billion and seven ways to look at your Analytics data, but I do most of my ogling from Acquisition > All Traffic > Channels. Here you get a great overview of your traffic and conversions sliced up by channels (Organic Search, Paid Search, Direct, Referral, etc). You can obviously adjust date ranges, compare to past date ranges, and view conversion metrics individually or as a whole. For me, this is Analytics home base.

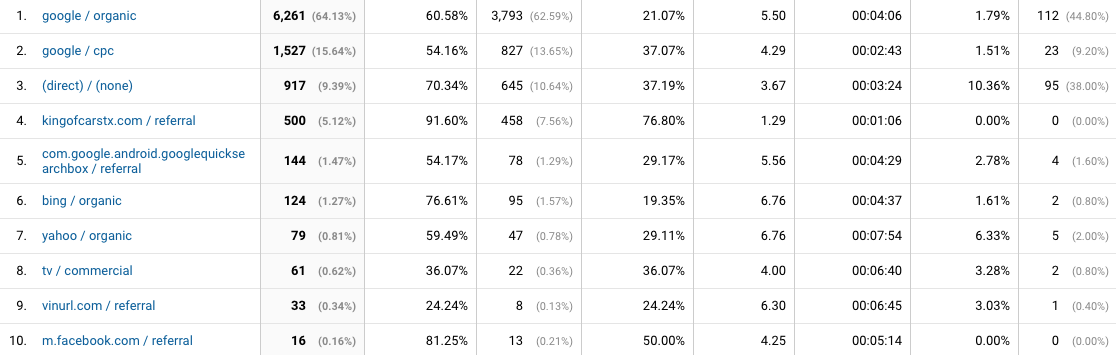
Acquisition > All Traffic > Source/Medium can be equally interesting, especially if you’ve made good use of tracking URLs.

Make some sweet SEO reports

I can populate almost my entire standard SEO client report from the Acquisition section of Analytics. Making conversions the star of the show really helps to keep clients engaged in their monthly reporting.

Google Analytics dashboards

Google’s Dashboards inside Analytics provide a great way to put the most important metrics together on a single screen. They’re easy to use, but I’ve always found them a bit limiting. Fortunately for data junkies, Google has recently released its next generation data visualization product…

Google Data Studio

This is pretty awesome. It’s very flexible, powerful, and user-friendly. I’d recommend skipping the Analytics Dashboards and going straight to Data Studio.

It will allow to you to beautifully dashboard-ify your data from Analytics, Adwords, Youtube, DoubleClick, and even custom databases or spreadsheets. All the data is “live” and dynamic. Users can even change data sources and date ranges on the fly! Bosses love it, clients love it, and marketers love it… provided everything is performing really well 😉

Supermetrics

If you want to get really fancy, and build your own fully custom dashboard, develop some truly bespoke analysis tools, or automate your reporting regimen, check out Supermetrics. It allows you to pull data from just about any source into Google Sheets or Excel. From there, your only limitation is your mastery of spreadsheet-fu and your imagination.

TL;DR

So that’s a lot of stuff. If you’d like to skip the more nuanced explanations, pro tips, and bad jokes, here’s the gist in point form:

  • Tracking your digital marketing is super important.
  • Don’t just track traffic. Tracking conversions is critical.
  • Use Google Analytics. Don’t let your agency use their own account.
  • Set up goals for every type of lead (forms, calls, chats, bookings, etc).
  • Track forms with destinations (thank you pages) or events.
  • Track your calls, probably using CallRail.
  • Use “number per source” if you have a huge volume of traffic; otherwise, use number pools (AKA keyword pools). Pools are better.
  • Set up Search Console and link it to your Analytics and Adwords accounts.
  • Link Adwords with Analytics.
  • Import Analytics conversions into Adwords instead of using Adwords’ native conversion tracking snippet…
  • …except for call extensions. Track those within and Adwords AND in Analytics (if you want to) by using an “offline” tracking number as the destination for your Google forwarding numbers.
  • Use Google Tag Manager if you have more than a couple third-party scripts to run on your site (web chat, Analytics, call tracking, Facebook Pixels etc).
  • Use Google Campaign URL Builder to create tracked URLs for tracking visitors from various sources like offline advertising, email signatures, etc.
  • Use a tracked URL on your GMB listing.
  • Use a tracked number as your “primary” GMB listing number (if you do this, make sure you put your real local number as a “secondary” number). Note: We think this is safe, but we don’t have quite enough data to say so unequivocally. YMMV.
  • Use vanity domains or short URLs that point to your tracking URLs to put on print materials, TV spots, etc.
  • Track your rankings like a boss.
  • Acquisition > All Traffic > Channels is your new Analytics home base.
  • Consider making some Google Analytics Dashboards… and then don’t, because Google Data Studio is way better. So use that.
  • Check out Supermetrics if you want to get really hardcore.
  • Don’t let your dreams be dreams.

If you’re new to tracking your digital marketing, I hope this provides a helpful starting point, and helps cut through some of the confusion and uncertainty about how to best get set up.

If you’re a conversion veteran, I hope there are a few new or alternative ideas here that you can use to improve your setup.

If you’ve got anything to add, correct, or ask, leave a comment!

Sign up for The Moz Top 10, a semimonthly mailer updating you on the top ten hottest pieces of SEO news, tips, and rad links uncovered by the Moz team. Think of it as your exclusive digest of stuff you don’t have time to hunt down but want to read!

How and Why to Do a Mobile/Desktop Parity Audit

Posted by Everett

Google still ranks webpages based on the content, code, and links they find with a desktop crawler. They’re working to update this old-school approach in favor of what their mobile crawlers find instead. Although the rollout will probably happen in phases over time, I’m calling the day this change goes live worldwide “D-day” in the post below. Mobilegeddon was already taken.

You don’t want to be in a situation on D-day where your mobile site has broken meta tags, unoptimized titles and headers, missing content, or is serving the wrong HTTP status code. This post will help you prepare so you can sleep well between now then.

What is a mobile parity audit?

When two or more versions of a website are available on the same URL, a “parity audit” will crawl each version, compare the differences, and look for errors.

When do you need one?

You should do a parity audit if content is added, removed, hidden, or changed between devices without sending the user to a new URL.

This type of analysis is also useful for mobile sites on a separate URL, but that’s another post.

What will it tell you? How will it help?

Is the mobile version of the website “optimized” and crawlable? Are all of the header response codes and tags set up properly, and in the same way, on both versions? Is important textual content missing from, or hidden, on the mobile version?

Why parity audits could save your butt

The last thing you want to do is scramble to diagnose a major traffic drop on D-day when things go mobile-first. Even if you don’t change anything now, cataloging the differences between site versions will help diagnose issues if/when the time comes.

It may also help you improve rankings right now.

I know an excellent team of SEOs for a major brand who, for severals months, had missed the fact that the entire mobile site (millions of pages) had title tags that all read the same: “BrandName – Mobile Site.” They found this error and contacted us to take a more complete look at the differences between the two sites. Here are some other things we found:

  1. One page type on the mobile site had an error at the template level that was causing rel=canonical tags to break, but only on mobile, and in a way that gave Google conflicting instructions, depending on whether they rendered the page as mobile or desktop. The same thing could have happened with any tag on the page, including robots meta directives. It could also happen with HTTP header responses.
  2. The mobile site has fewer than half the amount of navigation links in the footer. How will this affect the flow of PageRank to key pages in a mobile-first world?
  3. The mobile site has far more related products on product detail pages. Again, how will this affect the flow of PageRank, or even crawl depth, when Google goes mobile-first?
  4. Important content was hidden on the mobile version. Google says this is OK as long as the user can drop down or tab over to read the content. But in this case, there was no way to do that. The content was in the code but hidden to mobile viewers, and there was no way of making it visible.

How to get started with a mobile/desktop parity audit

It sounds complicated, but really it boils down to a few simple steps:

  1. Crawl the site as a desktop user.
  2. Crawl the site as a mobile user.
  3. Combine the outputs (e.g. Mobile Title1, Desktop Title1, Mobile Canonical1, Desktop Canonical1)
  4. Look for errors and differences.

Screaming Frog provides the option to crawl the site as the Googlebot Mobile user-agent with a smartphone device. You may or may not need to render JavaScript.

You can run two crawls (mobile and desktop) with DeepCrawl as well. However, reports like “Mobile Word Count Mismatch” do not currently work on dynamic sites, even after two crawls.

The hack to get at the data you want is the same as with Screaming Frog: namely, running two crawls, exporting two reports, and using Vlookups in Excel to compare the columns side-by-side with URL being the unique identifier.

Here’s a simplified example using an export from DeepCrawl:

As you can see in the screenshot above, blog category pages, like /category/cro/, are bigly different between devices types, not just in how they appear, but also in what code and content gets delivered and rendered as source code. The bigliest difference is that post teasers disappear on mobile, which accounts for the word count disparity.

Word count is only one data point. You would want to look at many different things, discussed below, when performing a mobile/desktop parity audit.

For now, there does NOT appear to be an SEO tool on the market that crawls a dynamic site as both a desktop and mobile crawler, and then generates helpful reports about the differences between them.

But there’s hope!

Our industry toolmakers are hot on the trail, and at this point I’d expect features to release in time for D-day.

Deep Crawl

We are working on Changed Metrics reports, which will automatically show you pages where the titles and descriptions have changed between crawls. This would serve to identify differences on dynamic sites when the user agent is changed. But for now, this can be done manually by downloading and merging the data from the two crawls and calculating the differences.

Moz Pro

Dr. Pete says they’ve talked about comparing desktop and mobile rankings to look for warning signs so Moz could alert customers of any potential issues. This would be a very helpful feature to augment the other analysis of on-page differences.

Sitebulb

When you select “mobile-friendly,” Sitebulb is already crawling the whole site first, then choosing a sample of (up to) 100 pages, and then recrawling these with the JavaScript rendering crawler. This is what produces their “mobile-friendly” report.

They’re thinking about doing the same to run these parity audit reports (mobile/desktop difference checker), which would be a big step forward for us SEOs. Because most of these disparity issues happen at the template/page type level, taking URLs from different crawl depths and sections of the site should allow this tool to alert SEOs of potential mismatches between content and page elements on those two versions of the single URL.

Screaming Frog

Aside from the oversensitive hash values, SF has no major advantage over DeepCrawl at the moment. In fact, DeepCrawl has some mobile difference finding features that, if they were to work on dynamic sites, would be leaps and bounds ahead of SF.

That said, the process shared below uses Screaming Frog because it’s what I’m most familiar with.

Customizing the diff finders

One of my SEO heroes, David Sottimano, whipped out a customization of John Resig’s Javascript Diff Algorithm to help automate some of the hard work involved in these desktop/mobile parity audits.

You can make a copy of it here. Follow the instructions in the Readme tab. Note: This is a work in progress and is an experimental tool, so have fun!

On using the hash values to quickly find disparities between crawls

As Lunametrics puts it in their excellent guide to Screaming Frog Tab Definitions, the hash value “is a count of the number of URLs that potentially contain duplicate content. This count filters for all duplicate pages found via the hash value. If two hash values match, the pages are exactly the same in content.”

I tried doing this, but found it didn’t work very well for my needs for two reasons: because I was unable to adjust the sensitivity, and if even only one minor client-side JavaScript element changed, the page would get a new hash value.

When I asked DeepCrawl about it, I found out why:

The problem with using a hash to flag different content is that a lot of pages would be flagged as different, when they are essentially the same. A hash will be completely different if a single character changes.

Mobile parity audit process using Screaming Frog and Excel

Run two crawls

First, run two separate crawls. Settings for each are below. If you don’t see a window or setting option, assume it was set to default.

1. Crawl 1: Desktop settings

Configurations —> Spider

Your settings may vary (no pun intended), but here I was just looking for very basic things and wanted a fast crawl.

Configurations —> HTTP Header —> User-Agent

2. Start the first crawl

3. Save the crawl and run the exports

When finished, save it as desktop-crawl.seospider and run the Export All URLs report (big Export button, top left). Save the export as desktop-internal_all.csv.

4. Update user-agent settings for the second crawl

Hit the “Clear” button in Screaming Frog and change the User-Agent configuration to the following:

5. Start the second crawl

6. Save the crawl and run the exports

When finished, save it as mobile-crawl.seospider and run the Export All URLs report. Save the export as mobile-internal_all.csv.

Combine the exports in Excel

Import each CSV into a separate tab within a new Excel spreadsheet.

Create another tab and bring in the URLs from the Address column of each crawl tab. De-duplicate them.

Use Vlookups or other methods to pull in the respective data from each of the other tabs.

You’ll end up with something like this:

A tab with a single row per URL, but with mobile and desktop columns for each datapoint. It helps with analysis if you can conditionally format/highlight instances where the desktop and mobile data does not match.

Errors & differences to look out for

Does the mobile site offer similar navigation options?

Believe it or not, you can usually fit the same amounts of navigation links onto a mobile site without ruining the user experience when done right. Here are a ton of examples of major retail brands approaching it in different ways, from mega navs to sliders and hamburger menus (side note: now I’m craving White Castle).

HTTP Vary User-Agent response headers

This is one of those things that seems like it could produce more caching problems and headaches than solutions, but Google says to use it in cases where the content changes significantly between mobile and desktop versions on the same URL. My advice is to avoid using Vary User-Agent if the variations between versions of the site are minimal (e.g. simplified navigation, optimized images, streamlined layout, a few bells and whistles hidden). Only use it if entire paragraphs of content and other important elements are removed.

Internal linking disparities

If your desktop site has twenty footer links to top-selling products and categories using optimized anchor text, and your mobile site has five links going to pages like “Contact Us” and “About” it would be good to document this so you know what to test should rankings drop after a mobile-first ranking algorithm shift.

Meta tags and directives

Do things like title tags, meta descriptions, robots meta directives, rel=canonical tags, and rel=next/prev tags match on both versions of the URL? Discovering this stuff now could avert disaster down the line.

Content length

There is no magic formula to how much content you should provide to each type of device, just as there is no magic formula for how much content you need to rank highly on Google (because all other things are never equal).

Imagine it’s eight months from now and you’re trying to diagnose what specific reasons are behind a post-mobile-first algorithm update traffic drop. Do the pages with less content on mobile correlate with lower rankings? Maybe. Maybe not, but I’d want to check on it.

Speed

Chances are, your mobile site will load faster. However, if this is not the case you definitely need to look into the issue. Lots of big client-side JavaScript changes could be the culprit.

Rendering

Sometimes JavaScript and other files necessary for the mobile render may be different from those needed for the desktop render. Thus, it’s possible that one set of resources may be blocked in the robots.txt file while another is not. Make sure both versions fully render without any blocked resources.

Here’s what you need to do to be ready for a mobile-first world:

  1. Know IF there are major content, tag, and linking differences between the mobile and desktop versions of the site.
  2. If so, know WHAT those differences are, and spend time thinking about how that might affect rankings if mobile was the only version Google ever looked at.
  3. Fix any differences that need to be fixed immediately, such as broken or missing rel=canonicals, robots meta, or title tags.
  4. Keep everything else in mind for things to test after mobile-first arrives. If rankings drop, at least you’ll be prepared.

And here are some tools & links to help you get there:

I suspect it won’t be long before this type of audit is made unnecessary because we’ll ONLY be worried about the mobile site. Until then, please comment below to share which differences you found, and how you chose to address them so we can all learn from each other.

Sign up for The Moz Top 10, a semimonthly mailer updating you on the top ten hottest pieces of SEO news, tips, and rad links uncovered by the Moz team. Think of it as your exclusive digest of stuff you don’t have time to hunt down but want to read!

Moz’s Brand-New SEO Learning Center Has Landed!

Posted by rachelgooodmanmoore

CHAPTER 1: A New Hope

A long time ago in a galaxy far, far away, marketers who wanted to learn about SEO were forced to mine deep into the caverns of Google search engine result pages to find the answers to even the most simple SEO questions.

Then, out of darkness came a new hope (with a mouthful of a name):

giphy.gif

…the Learn SEO and Search Marketing hub!

The SEO and Search Marketing hub housed resources like the Beginner’s Guide to SEO and articles about popular SEO topics like meta descriptions, title tags, and robots.txt. Its purpose was to serve as a one-stop-shop for visitors looking to learn what SEO was all about and how to use it on their own sites.

The Learn SEO and Search marketing hub would go on to serve as a guiding light for searchers and site visitors looking to learn the ropes of SEO for many years to come.

CHAPTER 2: The Learning Hub Strikes Back

Since its inception in 2010, this hub happily served hundreds of thousands of Internet folk looking to learn the ropes of SEO and search marketing. But time took its toll on the hub. As marketing and search engine optimization grew increasingly complex, the Learning Hub lapsed into disrepair. While new content was periodically added, that content was hard to find and often intermingled with older, out-of-date resources. The Learning Hub became less of a hub and more of a list of resources… some of which were also lists of resources.

giphy.gif

Offshoots like the Local Learning Center and Content Marketing Learning Center sprung up in an effort to tame the overgrown learning hub, but ‘twas all for naught: By autumn of 2016, Moz’s learning hub sites were a confusing nest of hard-to-navigate articles, guides, and 404s. Some articles were written for SEO experts and explained concepts in extensive, technical detail, while others were written for an audience with less extensive SEO knowledge. It was impossible to know which type of article you found yourself in before you wound up confused or discouraged.

What had once been a useful resource for marketers of all backgrounds was languishing in its age.

CHAPTER 3: The Return of the Learning Center

The vision behind the SEO and Search Marketing Hub had always been to educate SEOs and search marketers on the skills they needed to be successful in their jobs. While the site section continued to serve that purpose, somewhere along the along the way we started getting diminishing returns.

Our mission, then, was clear: Re-invent Moz’s learning resources with a new structure, new website, and new content.

As we set off on this mission, one thing was clear: The new Learning Center should serve as a home base for marketers and SEOs of all skill levels to learn what’s needed to excel in their work: from the fundamentals to expert-level content, from time-tested tenets of SEO success to cutting-edge tactics and tricks. If we weren’t able to accomplish this, our mission would all be for naught.

We also believed that a new Learning Center should make it easy for visitors of all skill levels and learning styles to find value: from those folks who want to read an article then dive into their work; to those who want to browse through libraries of focused SEO videos; to folks who want to learn from the experts in hands-on webinars.

So, that’s exactly what we built.

May we introduce to you the (drumroll, please) brand new, totally rebuilt SEO Learning Center!

giphy.gif

Unlike the “list of lists” in the old Learn SEO and Search Marketing hub, the new Learning Center organizes content by topic.

Each topic has its own “topic hub.” There are eleven of these and they cover:

Each of the eleven topic hubs host a slew of hand-picked articles, videos, blog posts, webinars, Q&A posts, templates, and training classes designed to help you dive deeper into your chosen SEO topic.

All eleven of the hubs contain a “fundamentals” menu to help you wrap your brain around a topic, as well as a content feed with hundreds of resources to help you go even further. These feed resources are filterable by topic (for instance, content that’s about both ranking & visibility AND local SEO), SEO skill level (from beginner to advanced), and format.

Use the Learning Center’s filters to zero in on exactly the content you’re looking for.

And, if you’re brand new to a topic or not sure where to start, you can always find a link to the Beginner’s Guide to SEO right at the top of each page.

But we can only explain so much in words — check it out for yourself:

Visit the new SEO Learning Center!

CHAPTER 4: The Content Awakens

One of the main motivations behind rebuilding the Learning Center website was to make it easier for folks to find and move through a slew of educational content, be that a native Learning Center article, a blog post, a webinar, or otherwise. But it doesn’t do any good to make content easier to find if that content is totally out-of-date and unhelpful.

giphy.gif

In addition to our mission to build a new Learning Center, we’ve also been quietly updating our existing articles to include the latest best practices, tactics, strategies, and resources. As part of this rewrite, we’ve also made an effort to keep each article as focused as possible around specifically one topic — a complete explanation of everything someone newer to the world of SEO needs to know about the given topic. What did that process look like in action? Check it out:

As of now we’ve updated 50+ articles, with more on the way!

Going forward, we’ll continue to iterate on the search experience within the new Learning Center. For example, while we always have our site search bar available, a Learning Center-specific search function would make finding articles even easier — and that’s just one of our plans for the future. Bigger projects include a complete update of the Beginner’s Guide to SEO (keep an eye on the blog for more news there, too), as well as our other introductory guides.

Help us, Moz-i Wan Community, you’re our only hope

We’ve already telekinetically moved mountains with this project, but the Learning Center is your resource — we’d love to hear what you’d like to see next, or if there’s anything really important you think we’ve missed. Head over, check it out, and tell us what you think in the comments!

Explore the new SEO Learning Center!

Sign up for The Moz Top 10, a semimonthly mailer updating you on the top ten hottest pieces of SEO news, tips, and rad links uncovered by the Moz team. Think of it as your exclusive digest of stuff you don’t have time to hunt down but want to read!

10 Things that DO NOT (Directly) Affect Your Google Rankings – Whiteboard Friday

Posted by randfish

What do the age of your site, your headline H1/H2 preference, bounce rate, and shared hosting all have in common? You might’ve gotten a hint from the title: not a single one of them directly affects your Google rankings. In this rather comforting Whiteboard Friday, Rand lists out ten factors commonly thought to influence your rankings that Google simply doesn’t care about.

http://ift.tt/2xno06G

http://ift.tt/1SsY8tZ

10 Things that do not affect your Google rankings

Click on the whiteboard image above to open a high-resolution version in a new tab!

http://ift.tt/2jPvg82

Video Transcription

Howdy, Moz fans, and welcome to another edition of Whiteboard Friday. This week we’re going to chat about things that do not affect your Google rankings.

So it turns out lots of people have this idea that anything and everything that you do with your website or on the web could have an impact. Well, some things have an indirect impact and maybe even a few of these do. I’ll talk through those. But tons and tons of things that you do don’t directly affect your Google rankings. So I’ll try and walk through some of these that I’ve heard or seen questions about, especially in the recent past.

1. The age of your website.

First one, longstanding debate: the age of your website. Does Google care if you registered your site in 1998 or 2008 or 2016? No, they don’t care at all. They only care the degree to which your content actually helps people and that you have links and authority signals and those kinds of things. Granted, it is true there’s correlation going in this direction. If you started a site in 1998 and it’s still going strong today, chances are good that you’ve built up lots of links and authority and equity and all these kinds of signals that Google does care about.

But maybe you’ve just had a very successful first two years, and you only registered your site in 2015, and you’ve built up all those same signals. Google is actually probably going to reward that site even more, because it’s built up the same authority and influence in a very small period of time versus a much longer one.

2. Whether you do or don’t use Google apps and services.

So people worry that, “Oh, wait a minute. Can’t Google sort of monitor what’s going on with my Google Analytics account and see all my data there and AdSense? What if they can look inside Gmail or Google Docs?”

Google, first off, the engineers who work on these products and the engineers who work on search, most of them would quit right that day if they discovered that Google was peering into your Gmail account to discover that you had been buying shady links or that you didn’t look as authoritative as you really were on the web or these kinds of things. So don’t fear the use of these or the decision not to use them will hurt or harm your rankings in Google web search in any way. It won’t.

3. Likes, shares, plus-ones, tweet counts of your web pages.

So you have a Facebook counter on there, and it shows that you have 17,000 shares on that page. Wow, that’s a lot of shares. Does Google care? No, they don’t care at all. In fact, they’re not even looking at that or using it. But what if it turns out that many of those people who shared it on Facebook also did other activities that resulted in lots of browser activity and search activity, click-through activity, increased branding, lower pogo-sticking rates, brand preference for you in the search results, and links? Well, Google does care about a lot of those things. So indirectly, this can have an impact. Directly, no. Should you buy 10,000 Facebook shares? No, you should not.

4. What about raw bounce rate or time on site?

Well, this is sort of an interesting one. Let’s say you have a time on site of two minutes, and you look at your industry averages, your benchmarks, maybe via Google Analytics if you’ve opted in to sharing there, and you see that your industry benchmarks are actually lower than average. Is that going to hurt you in Google web search? Not necessarily. It could be the case that those visitors are coming from elsewhere. It could be the case that you are actually serving up a faster-loading site and you’re getting people to the information that they need more quickly, and so their time on site is slightly lower or maybe even their bounce rate is higher.

But so long as pogo-sticking type of activity, people bouncing back to the search results and choosing a different result because you didn’t actually answer their query, so long as that remains fine, you’re not in trouble here. So raw bounce rate, raw time on site, I wouldn’t worry too much about that.

5. The tech under your site’s hood.

Are you using certain JavaScript libraries like Node or React, one is Facebook, one is Google. If you use Facebook’s, does Google give you a hard time about it? No. Facebook might, due to patent issues, but anyway we won’t worry about that. .NET or what if you’re coding up things in raw HTML still? Just fine. It doesn’t matter. If Google can crawl each of these URLs and see the unique content on there and the content that Google sees and the content visitors see is the same, they don’t care what’s being used under the hood to deliver that to the browser.

6. Having or not having a knowledge panel on the right-hand side of the search results.

Sometimes you get that knowledge panel, and it shows around the web and some information sometimes from Wikipedia. What about site links, where you search for your brand name and you get branded site links? The first few sets of results are all from your own website, and they’re sort of indented. Does that impact your rankings? No, it does not. It doesn’t impact your rankings for any other search query anyway.

It could be that showing up here and it probably is that showing up here means you’re going to get a lot more of these clicks, a higher share of those clicks, and it’s a good thing. But does this impact your rankings for some other totally unbranded query to your site? No, it doesn’t at all. I wouldn’t stress too much. Over time, sites tend to build up site links and knowledge panels as their brands become bigger and as they become better known and as they get more coverage around the web and online and offline. So this is not something to stress about.

7. What about using shared hosting or some of the inexpensive hosting options out there?

Well, directly, this is not going to affect you unless it hurts load speed or up time. If it doesn’t hurt either of those things and they’re just as good as they were before or as they would be if you were paying more or using solo hosting, you’re just fine. Don’t worry about it.

8. Use of defaults that Google already assumes.

So when Google crawls a site, when they come to a site, if you don’t have a robots.txt file, or you have a robots.txt file but it doesn’t include any exclusions, any disallows, or they reach a page and it has no meta robots tag, they’re just going to assume that they get to crawl everything and that they should follow all the links.

Using things like the meta robots “index, follow” or using, on an individual link, a rel=follow inside the href tag, or in your robots.txt file specifying that Google can crawl everything, doesn’t boost anything. They just assume all those things by default. Using them in these places, saying yes, you can do the default thing, doesn’t give you any special benefit. It doesn’t hurt you, but it gives you no benefit. Google just doesn’t care.

9. Characters that you use as separators in your title element.

So the page title element sits in the header of a document, and it could be something like your brand name and then a separator and some words and phrases after it, or the other way around, words and phrases, separator, the brand name. Does it matter if that separator is the pipe bar or a hyphen or a colon or any other special character that you would like to use? No, Google does not care. You don’t need to worry about it. This is a personal preference issue.

Now, maybe you’ve found that one of these characters has a slightly better click-through rate and preference than another one. If you’ve found that, great. We have not seen one broadly on the web. Some people will say they particularly like the pipe over the hyphen. I don’t think it matters too much. I think it’s up to you.

10. What about using headlines and the H1, H2, H3 tags?

Well, I’ve heard this said: If you put your headline inside an H2 rather than an H1, Google will consider it a little less important. No, that is definitely not true. In fact, I’m not even sure the degree to which Google cares at all whether you use H1s or H2s or H3s, or whether they just look at the content and they say, “Well, this one is big and at the top and bold. That must be the headline, and that’s how we’re going to treat it. This one is lower down and smaller. We’re going to say that’s probably a sub-header.”

Whether you use an H5 or an H2 or an H3, that is your CSS on your site and up to you and your designers. It is still best practices in HTML to make sure that the headline, the biggest one is the H1. I would do that for design purposes and for having nice clean HTML and CSS, but I wouldn’t stress about it from Google’s perspective. If your designers tell you, “Hey, we can’t get that headline in H1. We’ve got to use the H2 because of how our style sheets are formatted.” Fine. No big deal. Don’t stress.

Normally on Whiteboard Friday, we would end right here. But today, I’d like to ask. These 10 are only the tip of the iceberg. So if you have others that you’ve seen people say, “Oh, wait a minute, is this a Google ranking factor?” and you think to yourself, “Ah, jeez, no, that’s not a ranking factor,” go ahead and leave them in the comments. We’d love to see them there and chat through and list all the different non-Google ranking factors.

Thanks, everyone. See you again next week for another edition of Whiteboard Friday. Take care.

Video transcription by Speechpad.com

Sign up for The Moz Top 10, a semimonthly mailer updating you on the top ten hottest pieces of SEO news, tips, and rad links uncovered by the Moz team. Think of it as your exclusive digest of stuff you don’t have time to hunt down but want to read!

How to Prioritize SEO Tasks [+Worksheet]

Posted by BritneyMuller

“Where should a company start [with SEO]?” asked an attendee after my AMA Conference talk.

As my mind spun into a million different directions and I struggled to form complete sentences, I asked for a more specific website example. A healthy discussion ensued after more direction was provided, but these “Where do I start?” questions occur all the time in digital marketing.

SEOs especially are in a constant state of overwhelmed-ness (is that a word?), but no one likes to talk about this. It’s not comfortable to discuss the thousands of errors that came back after a recent site crawl. It’s not fun to discuss the drop in organic traffic that you can’t explain. It’s not possible to stay on top of every single news update, international change, case study, tool, etc. It’s exhausting and without a strategic plan of attack, you’ll find yourself in the weeds.

I’ve performed strategic SEO now for both clients and in-house marketing teams, and the following five methods have played a critical role in keeping my head above water.

First, I had to source this question on Twitter:

http://platform.twitter.com/widgets.js

Here was some of the best feedback from true industry leaders:

Screen Shot 2017-09-20 at 1.59.39 PM.png

Murat made a solid distinction between working with an SMBs versus a large companies:

Screen Shot 2017-09-20 at 2.03.26 PM.png

This is sad, but so true (thanks, Jeff!):

Screen Shot 2017-09-20 at 2.00.16 PM.png

To help you get started, I put together an SEO prioritization worksheet in Google Sheets. Make yourself a copy (File > Make a copy) and go wild!:

Free SEO prioritization workflow sheet

TLDR;

  1. Agree upon & set specific goals
  2. Identify important pages for conversions
  3. Perform a site crawl to uncover technical opportunities
  4. Employ Covey’s time management grid
  5. Provide consistent benchmarks and reports

#1 Start with the end in mind

What is the end goal? You can have multiple goals (both macro and micro), but establishing a specific primary end goal is critical.

The only way to agree upon an end goal is to have a strong understanding of your client’s business. I’ve always relied on these new client questions to help me wrap my head around a new client’s business.

[Please leave a comment if you have other favorite client questions!]

This not only helps you become way more strategic in your efforts, but also shows that you care.

Fun fact: I used to use an alias to sign up for my client’s medical consultations online to see what the process was like. What automated emails did they send after someone made an appointment? What are people required to bring into a consult? What is a consult like? How does a consult make someone feel?

Clients were always disappointed when I arrived for the in-person consult, but happy that my team and I were doing our research!

Goal setting tips:

Measurable

Seems obvious, but it’s essential to stay on track and set benchmarks along the way.

Be specific

Don’t let vague marketing jargon find its way into your goals. Be specific.

Share your goals

A study performed by Psychology professor Dr. Gail Matthews found that writing down and sharing your goals boosts your chances of achieving them.

Have a stretch goal

“Under-promise and over-deliver” is a great rule of thumb for clients, but setting private stretch goals (nearly impossible to achieve) can actually help you achieve more. Research found that when people set specific, challenging goals it led to higher performance 90% of the time.

#2 Identify important pages for conversions

There are a couple ways you can do this in Google Analytics.

Behavior Flow is a nice visualization for common page paths which deserve your attention, but it doesn’t display specific conversion paths very well.

Behavior flow google analytic report

It’s interesting to click on page destination goals to get a better idea of where people come into that page from and where they abandon it to:

behavior flow page path in google analytics

Reverse Goal Paths are a great way to discover which page funnels are the most successful for conversions and which could use a little more love:

Reverse goal path report in google analytics

If you want to know which pages have the most last-touch assists, create a Custom Report > Flat Table > Dimension: Goal Previous Step – 1 > Metric: Goal Completions > Save

Last touch page report in google analytics

Then you’ll see the raw data for your top last-touch pages:

Top pages report in Google Analytics

Side note: If the Marketing Services page is driving the second most assists, it’s a great idea to see where else on the site you can naturally weave in Marketing Services Page CTAs.

The idea here is to simply get an idea of which page funnels are working, which are not, and take these pages into high consideration when prioritizing SEO opportunities.

If you really want to become a conversion funnel ninja, check out this awesome Google Analytics Conversion Funnel Survival Guide by Kissmetrics.

#3 Crawl your site for issues

While many of us audit parts of a website by hand, we nearly all rely on a site crawl tool (or two) to uncover sneaky technical issues.

Some of my favorites:

I really like Moz Pro, DeepCrawl, and Raven for their automated re-crawling. I’m alerted anytime new issues arise (and they always do). Just last week, I got a Moz Pro email about these new pages that are now redirecting to a 4XX because we moved some Learning Center pages around and missed a few redirects (whoops!):

Screen Shot 2017-09-19 at 9.33.40 PM.png

An initial website crawl can be incredibly overwhelming and stressful. I get anxiety just thinking about a recent Moz site crawl: 54,995 pages with meta noindex, 60,995 pages without valid canonical, 41,234 without an <h1>… you get the idea. Ermahgerd!! Where do you start?!

This is where a time management grid comes in handy.

#4 Employ Covey’s time management grid

Screen Shot 2017-09-15 at 12.04.15 PM.png

Time management and prioritization is hard, and many of us fall into “Urgent” traps.

Putting out small, urgent SEO fires might feel effective in the short term, but you’ll often fall into productivity-killing rabbit holes. Don’t neglect the non-urgent important items!

Prioritize and set time aside for those non-urgent yet important tasks, like writing short, helpful, unique, click-enticing title tags for all primary pages.

Here’s an example of some SEO issues that fall into each of the above 4 categories:

Screen Shot 2017-09-15 at 12.03.55 PM.png

To help prioritize Not Urgent/Important issues for maximum effectiveness here at Moz, I’m scheduling time to address high-volume crawl errors.

Moz.com’s largest issues (highlighted by Moz Pro) are meta noindex. However, most of these are intentional.

Screen Shot 2017-06-16 at 2.41.12 PM.png

You also want to consider prioritizing any issues on the primary page flows that we discovered earlier. You can also sort issues by shallow crawl depth (fewer clicks from homepage, which are often primary pages to focus on):

Screen Shot 2017-09-15 at 12.44.50 PM.png

#5 Reporting & communication

Consistently reporting your efforts on increasing your client’s bottom line is critical for client longevity.

Develop a custom SEO reporting system that’s aligned with your client’s KPIs for every stage of your campaign. A great place to start is with a basic Google Analytics Custom Report that you can customize further for your client:

While traffic, search visibility, engagement, conversions, etc. get all of the reporting love, don’t forget about the not-so-tangible metrics. Are customers less frustrated navigating the new website? How does the new site navigation make a user feel? This type of monitoring and reporting can also be done through kickass tools like Lucky Orange or Mechanical Turk.

Lastly, reporting is really about communication and understanding people. Most of you have probably had a client who prefers a simple summary paragraph of your report, and that’s ok too.

Hopefully these tips can help you work smarter, not harder.

Image result for biker becomes a rocket gif

Don’t miss your site’s top technical SEO opportunities:

Crawl your site with Moz Pro

Sign up for The Moz Top 10, a semimonthly mailer updating you on the top ten hottest pieces of SEO news, tips, and rad links uncovered by the Moz team. Think of it as your exclusive digest of stuff you don’t have time to hunt down but want to read!

So You Want to Build a Chat Bot – Here’s How (Complete with Code!)

Posted by R0bin_L0rd

You’re busy and (depending on effective keyword targeting) you’ve come here looking for something to shave months off the process of learning to produce your own chat bot. If you’re convinced you need this and just want the how-to, skip to “What my bot does.” If you want the background on why you should be building for platforms like Google Home, Alexa, and Facebook Messenger, read on.

Why should I read this?

Do you remember when it wasn’t necessary to have a website? When most boards would scoff at the value of running a Facebook page? Now Gartner is telling us that customers will manage 85% of their relationship with brands without interacting with a human by 2020 and publications like Forbes are saying that chat bots are the cause.

The situation now is the same as every time a new platform develops: if you don’t have something your customers can access, you’re giving that medium to your competition. At the moment, an automated presence on Google Home or Slack may not be central to your strategy, but those who claim ground now could dominate it in the future.

The problem is time. Sure, it’d be ideal to be everywhere all the time, to have your brand active on every platform. But it would also be ideal to catch at least four hours sleep a night or stop covering our keyboards with three-day-old chili con carne as we eat a hasty lunch in between building two of the Next Big Things. This is where you’re fortunate in two ways;

  1. When we develop chat applications, we don’t have to worry about things like a beautiful user interface because it’s all speech or text. That’s not to say you don’t need to worry about user experience, as there are rules (and an art) to designing a good conversational back-and-forth. Amazon is actually offering some hefty prizes for outstanding examples.
  2. I’ve spent the last six months working through the steps from complete ignorance to creating a distributable chat bot and I’m giving you all my workings. In this post I break down each of the levels of complexity, from no-code back-and-forth to managing user credentials and sessions the stretch over days or months. I’m also including full code that you can adapt and pull apart as needed. I’ve commented each portion of the code explaining what it does and linking to resources where necessary.

I’ve written more about the value of Interactive Personal Assistants on the Distilled blog, so this post won’t spend any longer focusing on why you should develop chat bots. Instead, I’ll share everything I’ve learned.

What my built-from-scratch bot does

Ever since I started investigating chat bots, I was particularly interested in finding out the answer to one question: What does it take for someone with little-to-no programming experience to create one of these chat applications from scratch? Fortunately, I have direct access to someone with little-to-no experience (before February, I had no idea what Python was). And so I set about designing my own bot with the following hard conditions:


  1. It had to have some kind of real-world application. It didn’t have to be critical to a business, but it did have to bear basic user needs in mind.
  2. It had to be easily distributable across the immediate intended users, and to have reasonable scope to distribute further (modifications at most, rather than a complete rewrite).
  3. It had to be flexible enough that you, the reader, can take some free code and make your own chat bot.
  4. It had to be possible to adapt the skeleton of the process for much more complex business cases.
  5. It had to be free to run, but could have the option of paying to scale up or make life easier.
  6. It had to send messages confirming when important steps had been completed.

The resulting program is “Vietnambot,” a program that communicates with Slack, the API.AI linguistic processing platform, and Google Sheets, using real-time and asynchronous processing and its own database for storing user credentials.

If that meant nothing to you, don’t worry — I’ll define those things in a bit, and the code I’m providing is obsessively commented with explanation. The thing to remember is it does all of this to write down food orders for our favorite Vietnamese restaurant in a shared Google Sheet, probably saving tens of seconds of Distilled company time every year.

It’s deliberately mundane, but it’s designed to be a template for far more complex interactions. The idea is that whether you want to write a no-code-needed back-and-forth just through API.AI; a simple Python program that receives information, does a thing, and sends a response; or something that breaks out of the limitations of linguistic processing platforms to perform complex interactions in user sessions that can last days, this post should give you some of the puzzle pieces and point you to others.

What is API.AI and what’s it used for?

API.AI is a linguistic processing interface. It can receive text, or speech converted to text, and perform much of the comprehension for you. You can see my Distilled post for more details, but essentially, it takes the phrase “My name is Robin and I want noodles today” and splits it up into components like:

  • Intent: food_request
  • Action: process_food
  • Name: Robin
  • Food: noodles
  • Time: today

This setup means you have some hope of responding to the hundreds of thousands of ways your users could find to say the same thing. It’s your choice whether API.AI receives a message and responds to the user right away, or whether it receives a message from a user, categorizes it and sends it to your application, then waits for your application to respond before sending your application’s response back to the user who made the original request. In its simplest form, the platform has a bunch of one-click integrations and requires absolutely no code.

I’ve listed the possible levels of complexity below, but it’s worth bearing some hard limitations in mind which apply to most of these services. They cannot remember anything outside of a user session, which will automatically end after about 30 minutes, they have to do everything through what are called POST and GET requests (something you can ignore unless you’re using code), and if you do choose to have it ask your application for information before it responds to the user, you have to do everything and respond within five seconds.

What are the other things?

Slack: A text-based messaging platform designed for work (or for distracting people from work).

Google Sheets: We all know this, but just in case, it’s Excel online.

Asynchronous processing: Most of the time, one program can do one thing at a time. Even if it asks another program to do something, it normally just stops and waits for the response. Asynchronous processing is how we ask a question and continue without waiting for the answer, possibly retrieving that answer at a later time.

Database: Again, it’s likely you know this, but if not: it’s Excel that our code will use (different from the Google Sheet).

Heroku: A platform for running code online. (Important to note: I don’t work for Heroku and haven’t been paid by them. I couldn’t say that it’s the best platform, but it can be free and, as of now, it’s the one I’m most familiar with).

How easy is it?

This graph isn’t terribly scientific and it’s from the perspective of someone who’s learning much of this for the first time, so here’s an approximate breakdown:

Label

Functionality

Time it took me

1

You set up the conversation purely through API.AI or similar, no external code needed. For instance, answering set questions about contact details or opening times

Half an hour to distributable prototype

2

A program that receives information from API.AI and uses that information to update the correct cells in a Google Sheet (but can’t remember user names and can’t use the slower Google Sheets integrations)

A few weeks to distributable prototype

3

A program that remembers user names once they’ve been set and writes them to Google Sheets. Is limited to five seconds processing time by API.AI, so can’t use the slower Google Sheets integrations and may not work reliably when the app has to boot up from sleep because that takes a few seconds of your allocation*

A few weeks on top of the last prototype

4

A program that remembers user details and manages the connection between API.AI and our chosen platform (in this case, Slack) so it can break out of the five-second processing window.

A few weeks more on top of the last prototype (not including the time needed to rewrite existing structures to work with this)

*On the Heroku free plan, when your app hasn’t been used for 30 minutes it goes to sleep. This means that the first time it’s activated it takes a little while to start your process, which can be a problem if you have a short window in which to act. You could get around this by (mis)using a free “uptime monitoring service” which sends a request every so often to keep your app awake. If you choose this method, in order to avoid using all of the Heroku free hours allocation by the end of the month, you’ll need to register your card (no charge, it just gets you extra hours) and only run this application on the account. Alternatively, there are any number of companies happy to take your money to keep your app alive.

For the rest of this post, I’m going to break down each of those key steps and either give an overview of how you could achieve it, or point you in the direction of where you can find that. The code I’m giving you is Python, but as long as you can receive and respond to GET and POST requests, you can do it in pretty much whatever format you wish.


1. Design your conversation

Conversational flow is an art form in itself. Jonathan Seal, strategy director at Mando and member of British Interactive Media Association’s AI thinktank, has given some great talks on the topic. Paul Pangaro has also spoken about conversation as more than interface in multiple mediums.

Your first step is to create a flow chart of the conversation. Write out your ideal conversation, then write out the most likely ways a person might go off track and how you’d deal with them. Then go online, find existing chat bots and do everything you can to break them. Write out the most difficult, obtuse, and nonsensical responses you can. Interact with them like you’re six glasses of wine in and trying to order a lemon engraving kit, interact with them as though you’ve found charges on your card for a lemon engraver you definitely didn’t buy and you are livid, interact with them like you’re a bored teenager. At every point, write down what you tried to do to break them and what the response was, then apply that to your flow. Then get someone else to try to break your flow. Give them no information whatsoever apart from the responses you’ve written down (not even what the bot is designed for), refuse to answer any input you don’t have written down, and see how it goes. David Low, principal evangelist for Amazon Alexa, often describes the value of printing out a script and testing the back-and-forth for a conversation. As well as helping to avoid gaps, it’ll also show you where you’re dumping a huge amount of information on the user.

While “best practices” are still developing for chat bots, a common theme is that it’s not a good idea to pretend your bot is a person. Be upfront that it’s a bot — users will find out anyway. Likewise, it’s incredibly frustrating to open a chat and have no idea what to say. On text platforms, start with a welcome message making it clear you’re a bot and giving examples of things you can do. On platforms like Google Home and Amazon Alexa users will expect a program, but the “things I can do” bit is still important enough that your bot won’t be approved without this opening phase.

I’ve included a sample conversational flow for Vietnambot at the end of this post as one way to approach it, although if you have ideas for alternative conversational structures I’d be interested in reading them in the comments.

A final piece of advice on conversations: The trick here is to find organic ways of controlling the possible inputs and preparing for unexpected inputs. That being said, the Alexa evangelist team provide an example of terrible user experience in which a bank’s app said: “If you want to continue, say nine.” Quite often questions, rather than instructions, are the key.

2. Create a conversation in API.AI

API.AI has quite a lot of documentation explaining how to create programs here, so I won’t go over individual steps.

Key things to understand:

You create agents; each is basically a different program. Agents recognize intents, which are simply ways of triggering a specific response. If someone says the right things at the right time, they meet criteria you have set, fall into an intent, and get a pre-set response.

The right things to say are included in the “User says” section (screenshot below). You set either exact phrases or lists of options as the necessary input. For instance, a user could write “Of course, I’m [any name]” or “Of course, I’m [any temperature].” You could set up one intent for name-is which matches “Of course, I’m [given-name]” and another intent for temperature which matches “Of course, I’m [temperature],” and depending on whether your user writes a name or temperature in that final block you could activate either the “name-is” or “temperature-is” intent.

The “right time” is defined by contexts. Contexts help define whether an intent will be activated, but are also created by certain intents. I’ve included a screenshot below of an example interaction. In this example, the user says that they would like to go to on holiday. This activates a holiday intent and sets the holiday context you can see in input contexts below. After that, our service will have automatically responded with the question “where would you like to go?” When our user says “The” and then any location, it activates our holiday location intent because it matches both the context, and what the user says. If, on the other hand, the user had initially said “I want to go to the theater,” that might have activated the theater intent which would set a theater context — so when we ask “what area of theaters are you interested in?” and the user says “The [location]” or even just “[location],” we will take them down a completely different path of suggesting theaters rather than hotels in Rome.

The way you can create conversations without ever using external code is by using these contexts. A user might say “What times are you open?”; you could set an open-time-inquiry context. In your response, you could give the times and ask if they want the phone number to contact you. You would then make a yes/no intent which matches the context you have set, so if your user says “Yes” you respond with the number. This could be set up within an hour but gets exponentially more complex when you need to respond to specific parts of the message. For instance, if you have different shop locations and want to give the right phone number without having to write out every possible location they could say in API.AI, you’ll need to integrate with external code (see section three).

Now, there will be times when your users don’t say what you’re expecting. Excluding contexts, there are three very important ways to deal with that:

  1. Almost like keyword research — plan out as many possible variations of saying the same thing as possible, and put them all into the intent
  2. Test, test, test, test, test, test, test, test, test, test, test, test, test, test, test (when launched, every chat bot will have problems. Keep testing, keep updating, keep improving.)
  3. Fallback contexts

Fallback contexts don’t have a user says section, but can be boxed in by contexts. They match anything that has the right context but doesn’t match any of your user says. It could be tempting to use fallback intents as a catch-all. Reasoning along the lines of “This is the only thing they’ll say, so we’ll just treat it the same” is understandable, but it opens up a massive hole in the process. Fallback intents are designed to be a conversational safety net. They operate exactly the same as in a normal conversation. If a person asked what you want in your tea and you responded “I don’t want tea” and that person made a cup of tea, wrote the words “I don’t want tea” on a piece of paper, and put it in, that is not a person you’d want to interact with again. If we are using fallback intents to do anything, we need to preface it with a check. If we had to resort to it in the example above, saying “I think you asked me to add I don’t want tea to your tea. Is that right?” is clunky and robotic, but it’s a big step forward, and you can travel the rest of the way by perfecting other parts of your conversation.

3. Integrating with external code

I used Heroku to build my app . Using this excellent weather webhook example you can actually deploy a bot to Heroku within minutes. I found this example particularly useful as something I could pick apart to make my own call and response program. The weather webhook takes the information and calls a yahoo app, but ignoring that specific functionality you essentially need the following if you’re working in Python:

#start
    req = request.get_json
    print("Request:")
    print(json.dumps(req, indent=4))
#process to do your thing and decide what response should be

    res = processRequest(req)
# Response we should receive from processRequest (you’ll need to write some code called processRequest and make it return the below, the weather webhook example above is a good one).
{
        "speech": “speech we want to send back”,
        "displayText": “display text we want to send back, usually matches speech”,
        "source": "your app name"
    }

# Making our response readable by API.AI and sending it back to the servic

 response = make_response(res)
    response.headers['Content-Type'] = 'application/json'
    return response
# End

As long as you can receive and respond to requests like that (or in the equivalent for languages other than Python), your app and API.AI should both understand each other perfectly — what you do in the interim to change the world or make your response is entirely up to you. The main code I have included is a little different from this because it’s also designed to be the step in-between Slack and API.AI. However, I have heavily commented sections like like process_food and the database interaction processes, with both explanation and reading sources. Those comments should help you make it your own. If you want to repurpose my program to work within that five-second window, I would forget about the file called app.py and aim to copy whole processes from tasks.py, paste them into a program based on the weatherhook example above, and go from there.

Initially I’d recommend trying GSpread to make some changes to a test spreadsheet. That way you’ll get visible feedback on how well your application is running (you’ll need to go through the authorization steps as they are explained here).

4. Using a database

Databases are pretty easy to set up in Heroku. I chose the Postgres add-on (you just need to authenticate your account with a card; it won’t charge you anything and then you just click to install). In the import section of my code I’ve included links to useful resources which helped me figure out how to get the database up and running — for example, this blog post.

I used the Python library Psycopg2 to interact with the database. To steal some examples of using it in code, have a look at the section entitled “synchronous functions” in either the app.py or tasks.py files. Open_db_connection and close_db_connection do exactly what they say on the tin (open and close the connection with the database). You tell check_database to check a specific column for a specific user and it gives you the value, while update_columns adds a value to specified columns for a certain user record. Where things haven’t worked straightaway, I’ve included links to the pages where I found my solution. One thing to bear in mind is that I’ve used a way of including columns as a variable, which Psycopg2 recommends quite strongly against. I’ve gotten away with it so far because I’m always writing out the specific column names elsewhere — I’m just using that method as a short cut.

5. Processing outside of API.AI’s five-second window

It needs to be said that this step complicates things by no small amount. It also makes it harder to integrate with different applications. Rather than flicking a switch to roll out through API.AI, you have to write the code that interprets authentication and user-specific messages for each platform you’re integrating with. What’s more, spoken-only platforms like Google Home and Amazon Alexa don’t allow for this kind of circumvention of the rules — you have to sit within that 5–8 second window, so this method removes those options. The only reasons you should need to take the integration away from API.AI are:

  • You want to use it to work with a platform that it doesn’t have an integration with. It currently has 14 integrations including Facebook Messenger, Twitter, Slack, and Google Home. It also allows exporting your conversations in an Amazon Alexa-understandable format (Amazon has their own similar interface and a bunch of instructions on how to build a skill — here is an example.
  • You are processing masses of information. I’m talking really large amounts. Some flight comparison sites have had problems fitting within the timeout limit of these platforms, but if you aren’t trying to process every detail for every flight for the next 12 months and it’s taking more than five seconds, it’s probably going to be easier to make your code more efficient than work outside the window. Even if you are, those same flight comparison sites solved the problem by creating a process that regularly checks their full data set and creates a smaller pool of information that’s more quickly accessible.
  • You need to send multiple follow-up messages to your user. When using the API.AI integration it’s pretty much call-and-response; you don’t always get access to things like authorization tokens, which are what some messaging platforms require before you can automatically send messages to one of their users.
  • You’re working with another program that can be quite slow, or there are technical limitations to your setup. This one applies to Vietnambot, I used the GSpread library in my application, which is fantastic but can be slow to pull out bigger chunks of data. What’s more, Heroku can take a little while to start up if you’re not paying.

I could have paid or cut out some of the functionality to avoid needing to manage this part of the process, but that would have failed to meet number 4 in our original conditions: It had to be possible to adapt the skeleton of the process for much more complex business cases. If you decide you’d rather use my program within that five-second window, skip back to section 2 of this post. Otherwise, keep reading.

When we break out of the five-second API.AI window, we have to do a couple of things. First thing is to flip the process on its head.

What we were doing before:

User sends message -> API.AI -> our process -> API.AI -> user

What we need to do now:

User sends message -> our process -> API.AI -> our process -> user

Instead of API.AI waiting while we do our processing, we do some processing, wait for API.AI to categorize the message from us, do a bit more processing, then message the user.

The way this applies to Vietnambot is:

  1. User says “I want [food]”
  2. Slack sends a message to my app on Heroku
  3. My app sends a “swift and confident” 200 response to Slack to prevent it from resending the message. To send the response, my process has to shut down, so before it does that, it activates a secondary process using “tasks.”
  4. The secondary process takes the query text and sends it to API.AI, then gets back the response.
  5. The secondary process checks our database for a user name. If we don’t have one saved, it sends another request to API.AI, putting it in the “we don’t have a name” context, and sends a message to our user asking for their name. That way, when our user responds with their name, API.AI is already primed to interpret it correctly because we’ve set the right context (see section 1 of this post). API.AI tells us that the latest message is a user name and we save it. When we have both the user name and food (whether we’ve just got it from the database or just saved it to the database), Vietnambot adds the order to our sheet, calculates whether we’ve reached the order minimum for that day, and sends a final success message.

6. Integrating with Slack

This won’t be the same as integrating with other messaging services, but it could give some insight into what might be required elsewhere. Slack has two authorization processes; we’ll call one “challenge” and the other “authentication.”

Slack includes instructions for an app lifecycle here, but API.AI actually has excellent instructions for how to set up your app; as a first step, create a simple back-and-forth conversation in API.AI (not your full product), go to integrations, switch on Slack, and run through the steps to set it up. Once that is up and working, you’ll need to change the OAuth URL and the Events URL to be the URL for your app.

Thanks to github user karishay, my app code includes a process for responding to the challenge process (which will tell Slack you’re set up to receive events) and for running through the authentication process, using our established database to save important user tokens. There’s also the option to save them to a Google Sheet if you haven’t got the database established yet. However, be wary of this as anything other than a first step — user tokens give an app a lot of power and have to be guarded carefully.

7. Asynchronous processing

We are running our app using Flask, which is basically a whole bunch of code we can call upon to deal with things like receiving requests for information over the internet. In order to create a secondary worker process I’ve used Redis and Celery. Redis is our “message broker”; it makes makes a list of everything we want our secondary process to do. Celery runs through that list and makes our worker process do those tasks in sequence. Redis is a note left on the fridge telling you to do your washing and take out the bins, while Celery is the housemate that bangs on your bedroom door, note in hand, and makes you do each thing. I’m sure our worker process doesn’t like Celery very much, but it’s really useful for us.

You can find instructions for adding Redis to your app in Heroku here and you can find advice on setting up Celery in Heroku here. Miguel Grinberg’s Using Celery with Flask blog post is also an excellent resource, but using the exact setup he gives results in a clash with our database, so it’s easier to stick with the Heroku version.

Up until this point, we’ve been calling functions in our main app — anything of the form function_name(argument_1, argument_2, argument_3). Now, by putting “tasks.” in front of our function, we’re saying “don’t do this now — hand it to the secondary process.” That’s because we’ve done a few things:

  • We’ve created tasks.py which is the secondary process. Basically it’s just one big, long function that our main code tells to run.
  • In tasks.py we’ve included Celery in our imports and set our app as celery.Celery(), meaning that when we use “app” later we’re essentially saying “this is part of our Celery jobs list” or rather “tasks.py will only do anything when its flatmate Celery comes banging on the door”
  • For every time our main process asks for an asynchronous function by writing tasks.any_function_name(), we have created that function in our secondary program just as we would if it were in the same file. However in our secondary program we’ve prefaced with “@app.task”, another way of saying “Do wash_the_dishes when Celery comes banging the door yelling wash_the_dishes(dishes, water, heat, resentment)”.
  • In our “procfile” (included as a file in my code) we have listed our worker process as –app=tasks.app

All this adds up to the following process:

  1. Main program runs until it hits an asynchronous function
  2. Main program fires off a message to Redis which has a list of work to be done. The main process doesn’t wait, it just runs through everything after it and in our case even shuts down
  3. The Celery part of our worker program goes to Redis and checks for the latest update, it checks what function has been called (because our worker functions are named the same as when our main process called them), it gives our worker all the information to start doing that thing and tells it to get going
  4. Our worker process starts the action it has been told to do, then shuts down.

As with the other topics mentioned here, I’ve included all of this in the code I’ve supplied, along with many of the sources used to gather the information — so feel free to use the processes I have. Also feel free to improve on them; as I said, the value of this investigation was that I am not a coder. Any suggestions for tweaks or improvements to the code are very much welcome.


Conclusion

As I mentioned in the introduction to this post, there’s huge opportunity for individuals and organizations to gain ground by creating conversational interactions for the general public. For the vast majority of cases you could be up and running in a few hours to a few days, depending on how complex you want your interactions to be and how comfortable you are with coding languages. There are some stumbling blocks out there, but hopefully this post and my obsessively annotated code can act as templates and signposts to help get you on your way.

Grab my code at GitHub


Bonus #1: The conversational flow for my chat bot

This is by no means necessarily the best or only way to approach this interaction. This is designed to be as streamlined an interaction as possible, but we’re also working within the restrictions of the platform and the time investment necessary to produce this. Common wisdom is to create the flow of your conversation and then keep testing to perfect, so consider this example layout a step in that process. I’d also recommend putting one of these flow charts together before starting — otherwise you could find yourself having to redo a bunch of work to accommodate a better back-and-forth.

Bonus #2: General things I learned putting this together

As I mentioned above, this has been a project of going from complete ignorance of coding to slightly less ignorance. I am not a professional coder, but I found the following things I picked up to be hugely useful while I was starting out.

  1. Comment everything. You’ll probably see my code is bordering on excessive commenting (anything after a # is a comment). While normally I’m sure someone wouldn’t want to include a bunch of Stack Overflow links in their code, I found notes about what things portions of code were trying to do, and where I got the reasoning from, hugely helpful as I tried to wrap my head around it all.
  2. Print everything. In Python, everything within “print()” will be printed out in the app logs (see the commands tip for reading them in Heroku). While printing each action can mean you fill up a logging window terribly quickly (I started using the Heroku add-on LogDNA towards the end and it’s a huge step up in terms of ease of reading and length of history), often the times my app was falling over was because one specific function wasn’t getting what it needed, or because of another stupid typo. Having a semi-constant stream of actions and outputs logged meant I could find the fault much more quickly. My next step would probably be to introduce a way of easily switching on and off the less necessary print functions.
  3. The following commands: Heroku’s how-to documentation for creating an app and adding code is pretty great, but I found myself using these all the time so thought I’d share (all of the below are written in the command line; type cmd in on Windows or by running Terminal on a Mac):
    1. CD “””[file location]””” – select the file your code is in
    2. “git init” – create a git file to add to
    3. “git add .” – add all of the code in your file into the file that git will put online
    4. “git commit -m “[description of what you’re doing]” “ – save the data in your git file
    5. “heroku git:remote -a [the name of your app]” – select your app as where to put the code
    6. “git push heroku master” – send your code to the app you selected
    7. “heroku ps” – find out whether your app is running or crashed
    8. “heroku logs” – apologize to your other half for going totally unresponsive for the last ten minutes and start the process of working through your printouts to see what has gone wrong
  4. POST requests will always wait for a response. Seems really basic — initially I thought that by just sending a POST request and not telling my application to wait for a response I’d be able to basically hot-potato work around and not worry about having to finish what I was doing. That’s not how it works in general, and it’s more of a symbol of my naivete in programming than anything else.
  5. If something is really difficult, it’s very likely you’re doing it wrong.
    While I made sure to do pretty much all of the actual work myself (to
    avoid simply farming it out to the very talented individuals at
    Distilled), I was lucky enough to get some really valuable advice. The
    piece of advice above was from Dominic Woodman, and I should have
    listened to it more. The times when I made least progress were when I
    was trying to use things the way they shouldn’t be used. Even when I
    broke through those walls, I later found that someone didn’t want me to
    use it that way because it would completely fail at a later point.
    Tactical retreat
    is an option. (At this point, I should mention he wasn’t
    the only one to give invaluable advice; Austin, Tom, and Duncan of the
    Distilled R&D team were a huge help.)

Sign up for The Moz Top 10, a semimonthly mailer updating you on the top ten hottest pieces of SEO news, tips, and rad links uncovered by the Moz team. Think of it as your exclusive digest of stuff you don’t have time to hunt down but want to read!

The Anatomy of a $97 Million Page: A CRO Case Study

Posted by jkuria

In this post, we share a CRO case study from Protalus, one of the fastest-growing footwear companies in the world. They make an insole that corrects the misalignment suffered by roughly 85% of the population. Misalignment is the cause of most back, knee, and foot pain. Back pain alone is estimated to be worth $100 billion a year.


Summary

  • We (with Protalus’ team) increased direct sales by 91% in about 6 months through one-click upsells and CRO.
  • Based on the direct sales increase, current run-rate revenue, the “Virtuous Cycle of CRO”-fueled growth rate, and revenue multiple for their industry, we estimate this will add about $97 million to the company’s valuation over the next 12–18 months*.
  • A concrete example of the Virtuous Cycle of CRO: Before we increased the conversion rate and average order value, Google Adwords was not a viable channel. Now it is, opening a whole new floodgate of profitable sales! Ditto for at least two other channels. In part due to our work, Protalus’ annual run-rate revenue has grown by 1,212% in less than a year.

* Protalus’ core product is differentiated, patent protected, and high margin. They also have a strong brand and raving fans. In the Shoes & Apparel category, they’re most similar to Lululemon Athletica, which has a 4x plus revenue multiple. While Nike and Under Armor engage in a bloody price war and margin-eroding celebrity endorsements, Lululemon commands significantly higher prices than its peers, without big-name backers! Business gurus Warren Buffett and Charlie Munger often say that the true test of a defensive moat around a business is “Can you raise prices without hurting sales?” Protalus has this in spades. They’ve raised prices several times while simultaneously increasing units sold — from $39 to $49 to $59 to $69 to $79 to $99 to $119.


One-click upsells: A 21% sales boost

When we do engagements, the first order of business to uncover low-hanging fruit growth opportunities. This accomplishes two things:

  1. It helps the client get an immediate ROI on the engagement
  2. It earns us goodwill and credibility within the company. We then have wide latitude to run the big, bold experiments that produce huge conversion lifts

In Protalus’ case, we determined they were not doing post-purchase one-click upsells. Adding these immediately boosted sales by 21%. Here’s how we did it:

  • On their main sales landing page, Protalus has an offer where you get $30 off on the second pair of insoles, as well as free expedited shipping for both. About 30% of customers were taking this offer.
  • For those who didn’t, right after they purchased but BEFORE they got to the “Thank You” page, we presented the offer again, which led to the 21% sales increase.

Done correctly, one-click upsells easily boost sales, as customers do not have to re-enter credit card details. Here’s the best way to do them: The Little Secret that Made McDonalds a $106 Billion Behemoth.

Below is the final upsell page that got the 21% sales increase:

A screenshot of a cell phone Description generated with very high confidence

We tested our way to it. The key effective elements are:

1. Including “free upgrade to expedited shipping” in the headline: 145% lift

The original page had it lower in the body copy:

Google Experiments screenshot showing 145% lift

2. Adding celebrity testimonials: 60% lift

Google Experiments screenshot showing a 60% lift

Elisabeth Howard’s (Ms. Senior America) unsolicited endorsement is especially effective because about 60% of Protalus’ customers are female and almost one-third are retired. We uncovered these gems by reviewing all 11,000 (at the time) customers’ testimonials.

3. Explaining the reasons why other customers bought additional insoles.

See the three bulleted reasons on the first screenshot (convenience, different models, purchasing for loved ones).


Radical re-design and long-form page: A 58% conversion lift

With the upsells producing positive ROI for the client, we turned to re-designing the main sales page. The new page produced a cumulative lift of 58%, attained in two steps.

[Step 1] 35% lift: Long-form content-rich page

Optimizely screenshot shows 35% lift at 99% statistical significance

Note that even after reaching 99% statistical significance, the lift fluctuated between 33% and 37%, so we’ll claim 35%.

[Step 2] 17% lift: Performance improvements

The new page was quite a bit longer, so its “fully loaded” time increased a lot — especially on mobile devices with poor connections. A combination of lazy loading, lossless image shrinking, CSS sprites, and other ninja tactics led to a further 17% lift.

These optimizations reduced the page load time by 40% and shrunk the size by a factor of 4x!

The total cumulative lift was therefore 58% (1.35 x 1.17 = 1.58).

With the earlier 21% sales gain from one-click upsells, that’s a 91% sales increase (1.21 x 1.35 x 1.17 = 1.91).


Dissecting the anatomy of the winning page

To determine what vital few elements to change, we surveyed the non-converting visitors. Much of the work in A/B testing is the tedious research required to understand non-converting visitors.

“Give me six hours to chop a tree and I’ll spend the first four sharpening the axe.” – Abraham Lincoln

All CRO practitioners would do well to learn from good, ol’ honest Abe! We used Mouseflow’s feedback feature to survey bouncing visitors from the main landing page and the check-out page. The top objection themes were:

  1. Price is too high/product too expensive
  2. Not sure it will work (because others didn’t work before)
  3. Not sure it will work for my specific condition
  4. Difficulty in using website

We then came up with specific counter-objections for each: A landing page is a “salesmanship in digital print,” so many of the techniques that work in face-to-face selling also apply.

On a landing page, though, you must overcorrect because you lack the back- and-forth conversation in a live selling situation. Below is the list of key elements on the winning page.

1. Price is too high/product is too expensive

This was by far the biggest objection, cited by over 50% of all respondents. Thus, we spent a disproportionate amount of effort and page real estate on it.

Protalus’ insoles cost $79, whereas Dr. Scholls (the 100-year-old brand) cost less than $10. When asked what other products they considered, customers frequently said Dr. Scholls.

Coupled with this, nearly one-third of customers are retired and living on a fixed income.

“I ain’t gonna pay no stinkin’ $79! They cost more than my shoes,” one visitor remarked.

To overcome the price objection, we did a couple of things.

Articulated the core value proposition and attacked the price from the top

When prospects complain about price it simply means that they do not understand or appreciate the the product’s value proposition. They are seeing this:

The product’s cost exceeds the perceived value

To effectively deal with price, you must tilt the scale so that it looks like this instead:

The perceived value exceeds cost

While the sub-$10 Dr. Scholls was the reference point for many, we also learned that some customers had tried custom orthotics ($600 to $3,000) and Protalus’ insoles compared favorably.

We therefore decided our core value proposition would be:

“Avoid paying $600 for custom orthotics. Protalus insoles are almost as effective but cost 87% less.”

…forcing the $600 reference point, instead of the $10 for Dr. Scholls. In the conversion rate heuristic we use, the value proposition is the single biggest lever.

We explained all this from a “neutral” educational standpoint (rather than a salesy one) in three steps:

1. First, we use “market data” to explain the cause of most pain and establish that custom orthotics are more effective than over-the-counter insoles. Market data is always more compelling than product data, so you should lead with it.

C:\Users\jkuri\AppData\Local\Temp\SNAGHTML32c02fc1.PNG

2. Next, like a good trial lawyer, we show why Protalus insoles are similar to custom orthotics but cost 87% less:

C:\Users\jkuri\AppData\Local\Temp\SNAGHTML32c1e5dd.PNG

3. Finally, we deal with the “elephant in the room” and explain how Protalus insoles are fundamentally different from Dr. Scholls:

C:\Users\jkuri\AppData\Local\Temp\SNAGHTML32c39c19.PNG

We also used several verbatim customer testimonials to reinforce this point:

C:\Users\jkuri\AppData\Local\Temp\SNAGHTML32c7042b.PNG

C:\Users\jkuri\AppData\Local\Temp\SNAGHTML32c8a047.PNG

Whenever possible, let others do your bragging!

Attacked price from the bottom

Here, we used a technique known as “break the price down to the ridiculous.” $79 is just 44 cents per day, less than a K-cup of coffee — which most people consume once or twice a day! This makes the price more palatable.

C:\Users\jkuri\AppData\Local\Temp\SNAGHTML32cd1f37.PNG

Used the quality argument

The quality technique is from Zig Ziglar’s Sales Training. You say to a prospect:

“Many years ago, our company/founder/founding team made a basic decision. We decided it would be easier to use the highest quality materials and explain price one time than it would be to apologize for low quality forever. When you use the product/service, you’ll be glad we made that decision.”

It’s especially effective if the company has a well-known “maker” founder (like Yvon Chouinardat at Patagonia). It doesn’t work as well for MBAs or suits, much as we need them!

Protalus’ founder Chris Buck designed the insoles and has a cult-like following, so it works for him.

Dire outcomes of not taking action

Here we talked about the dire outcomes if you do not get the insoles; for example, surgery, doctors’ bills, and lost productivity at work! Many customers work on their feet all day (nurses, steelworkers, etc.) so this last point is highly relevant.

C:\Users\jkuri\AppData\Local\Temp\SNAGHTML3717c03d.PNG

Microsoft employed this technique successfully against Linux in the early 2000s. While Linux was free, the “Total Cost of Ownership” for not getting Windows was much higher when you considered support, frequent bugs, less accountability, fewer feature updates, and so on.

2. Not sure the product will work

For this objection, we did the following:

Used Dr. Romansky

We prominently featured Dr. Romansky, Protalus’ resident podiatrist. A consultant to the US Men’s and Women’s soccer teams and the Philadephia Phillies baseball team, he has serious credibility.

C:\Users\jkuri\AppData\Local\Temp\SNAGHTML371d6ed4.PNG

The “educational” part of the landing page (above the fold) is done in “his voice.” Before, only his name appeared on a rarely visited page. This is an example of a “hidden wealth” opportunity!

Used celebrity testimonials on the main landing page

Back in 1997, a sports writer asked Phil Knight (Nike’s founder): “Is there no better way for you to spend $100 million?”

You see, Knight had just paid that staggering sum to a young Tiger Woods — and it seemed extravagant!

Knight’s answer? An emphatic “No!” That $100 million would generate several billion dollars in sales for Nike over the next decade!

Celebrity testimonials work. Period.

Since our celebrity endorsements increased the one-click upsell take-rate by 60%, we also used them on the main page:

C:\Users\jkuri\AppData\Local\Temp\SNAGHTML372a0993.PNG

C:\Users\jkuri\AppData\Local\Temp\SNAGHTML3728f545.PNG

Used expert reviews

We solicited and included expert reviews from industry and medical professionals. Below are two of the four we used:

C:\Users\jkuri\AppData\Local\Temp\SNAGHTML372ff274.PNG

C:\Users\jkuri\AppData\Local\Temp\SNAGHTML37315c55.PNG

These also helped address the price concern because some site visitors had expressed discomfort paying so much for an over-the-counter product without doctor recommendation.

3. Not sure the product will work for me

This is different from “Not sure the product will work” and needs to be treated separately. If there’s one thing we’ve learned over the years, it is that everyone thinks their situation is one-in-a-million unique!

We listed all the conditions that Protalus insoles address, as well as those they do not.

C:\Users\jkuri\AppData\Local\Temp\SNAGHTML37353580.PNG

In addition, we clearly stated that the product does not work for 15% of the population.

By conspicuously admitting this (NOT just in the fine print section!) you are more credible. This is expressed in the Prospect’s Protest as:

“First tell me what your product CANNOT do and I might believe you when you tell me what it can do!”

4. Difficulty in using the site

Several visitors reported difficulty using the site, so we used Mouseflow’s powerful features to detect and fix usability issues.

Interestingly, the visitor session recordings confirmed that price was a big issue as we could clearly see prospects navigate to the price, stare incredulously, and then leave!

Accentuate the customers’ reasons for buying

Most of the opportunity in CRO is in the non-converting visitors (often over 90%), but understanding converting ones can yield crucial insights.*

For Protalus, the top reasons for buying were:

  • Desperation/too much leg, knee, or back pain/willing to try anything (This is the 4M, for “motivation,” in the strategic formula we use)
  • The testimonials were persuasive
  • Video was convincing

On the last point, the Mouseflow heatmaps showed that those who watched the video bought at a much higher rate, yet few watched it.

We therefore placed the video higher above the fold, used an arrow to draw attention, and inserted a sub-headline:

C:\Users\jkuri\AppData\Local\Temp\SNAGHTML373cd9dc.PNG

A million-dollar question we ask buyers is:

“Was there any reason you ALMOST DID NOT buy?”

Devised by Cambridge-educated Dr. Karl Blanks, who coined the term “conversion rate optimization” in 2006, this question earned him a knighthood from the Queen of England! Thanks, Sir Karl!

It’s a great question because its answer is usually the reason many others didn’t buy. For every person who almost didn’t buy for reason X, I guarantee at least three others did not buy!

Given the low response rates when surveying non-converting visitors, this question helps get additional intelligence. In our case, price came up again.

*Sometimes the customers’ reasons for buying will surprise you. One of our past clients is in the e-cigarette/vaping business and a common reason cited by men for vaping was “to quit smoking because of my young daughter.” They almost never said “child” or “son”! Armed with this knowledge, we converted a whole new segment of smokers who had not considered vaping.

Speed testimonials

One of the most frequently asked questions was “How soon can I expect relief?” While Protalus addressed this in their Q&A section, we included conspicuous “speed testimonials” on the main page:

C:\Users\jkuri\AppData\Local\Temp\SNAGHTML37a1de17.PNG

For someone in excruciating pain, the promise of fast relief is persuasive!

Patent protection exclusivity & social proof

C:\Users\jkuri\AppData\Local\Temp\SNAGHTML37494993.PNG

Many of Protalus’ site visitors are older and still prefer to buy in physical stores, as we learned from our survey. They may like the product, but then think “I’ll buy them at the store.” We clarified that the product is only available on Protalus’ site.

Mentioning the patent-protection added exclusivity, one of the two required elements for a compelling value proposition.

At its core, landing page optimization isn’t about optimizing pages. A page just happens to be the medium used to optimize thought sequences in the prospect’s mind.

Dr. Flint likes to say, “The geography of the page determines the chronology of thought sequences in the prospect’s mind.” As shown above, we repeated the social proof elements at the point of purchase.

Tying it all together

After systematically addressing each objection and adding various appeal elements, we strung them all in the cohesive long-form page below.

We start with a powerful headline and Elisabeth’s story because it’s both intriguing and relevant to Protalus’ audience, which skews female and over 55. The only goal of a headline is to get visitors to read what comes next — NOT to sell.

The product’s price is not mentioned until we have told a compelling story, educated visitors and engaged them emotionally.

Note that the winning page is several times longer than the control. There is a mistaken belief that you “just need to get to the point” because people won’t read long pages. In fact, a previous consultant told Protalus that their sales were low because the “buy button” wasn’t high enough on the page. 🙂

Nothing could be further from the truth. For a high-priced product, you must articulate a compelling value proposition before you sell!

But also note the page is “as long as necessary, but as short as possible.” Buy buttons are sprinkled liberally after the initial third of the page so that those who are convinced needn’t “sit through the entire presentation.”


Acknowledgement

We’d like to thank team Protalus for giving us wide latitude to conduct bold experiments and for allowing us to publish this. Their entrepreneurial culture has been refreshing. We are most grateful to Don Vasquez, their forward-thinking CMO (and minority owner), for trusting the process and standing by us when the first test caused some revenue loss.

Thanks to Hayk Saakian, Nick Jordan, Yin-so Chen, and Jon Powell for reading drafts of this piece.


Free CRO audit

I can’t stress this enough: CRO is hard work. We spent countless hours on market research, studied visitor behavior, and reviewed tens of thousands of customer comments before we ran a single A/B test. We also solicited additional testimonials from industry experts and doctors. There is no magical silver bullet — just lots of little lead ones!

Results like this don’t happen by accident. If you are unhappy with your current conversion rate for sales, leads or app downloads, first, we encourage you to review the tried-and-true strategic formula. Next, we would like to offer Moz readers a free CRO audit. We’ll also throw in a free SEO (Search Engine Optimization) review. While we specialize in CRO, we’ve partnered with one of the best SEO firms due to client demand. Lastly, we are hiring. Review the roles and reasons why you should come work for us!

Sign up for The Moz Top 10, a semimonthly mailer updating you on the top ten hottest pieces of SEO news, tips, and rad links uncovered by the Moz team. Think of it as your exclusive digest of stuff you don’t have time to hunt down but want to read!

Understanding and Harnessing the Flow of Link Equity to Maximize SEO Ranking Opportunity – Whiteboard Friday

Posted by randfish

How does the flow of link equity work these days, and how can you harness its potential to help improve your rankings? Whether you’re in need of a refresher or you’ve always wanted a firmer grasp of the concept, this week’s Whiteboard Friday is required watching. Rand covers the basic principles of link equity, outlines common flow issues your site might be encountering, and provides a series of action items to ensure your site is riding the right currents.

http://ift.tt/2ybEMFV

http://ift.tt/1SsY8tZ

Link equity flow

Click on the whiteboard image above to open a high-resolution version in a new tab!

Video Transcription

Howdy, Moz fans, and welcome to another edition of Whiteboard Friday. This week we’re going to chat about understanding and harnessing link equity flow, primarily internal link equity flow, so that you can get better rankings and execute on your SEO. A big thank you to William Chou, @WChouWMX on Twitter, for suggesting this topic. If you have a topic or something that you would like to see on Whiteboard Friday, tweet at me. We’ll add it to the list.

Principles of link equity

So some principles of link equity first to be aware of before we dive into some examples.

1. External links generally give more ranking value and potential ranking boosts than internal links.

That is not to say, though, that internal links provide no link equity, and in fact, many pages that earn few or no external links can still rank well if a domain itself is well linked to and that page is on that site and has links from other good, important pages on the domain. But if a page is orphaned or if a domain has no links at all, extremely difficult to rank.

2. Well-linked-to pages, both internal and external, pass more link equity than those that are poorly linked to.

I think this makes intuitive sense to all of us who have understood the concept of PageRank over the years. Basically, if a page accrues many links, especially from other important pages, that page’s ability to pass its link equity to other pages, to give a boost in ranking ability is stronger than if a page is very poorly linked to or not linked to at all.

3. Pages with fewer links tend to pass more equity to their targets than pages with more links.

Again, going off the old concept of PageRank, if you have a page with hundreds or thousands of links on it, each of those receives a much more fractional, smaller amount of the link equity that could be passed to it than if you have a page with only a few links on it. This is not universally… well, I just want to say this doesn’t scale perfectly. So it’s not the case that if you were to trim down your high link earning pages to having only one link and point to this particular page on your site, then you suddenly get tremendously more benefit than if you had your normal navigation on that page and you link to your homepage and About page and products page. That’s not really the case. But if you had a page that had hundreds of links in a row and you instead made that page have only a few links to the most important, most valuable places, you’ll get more equity out of that, more rank boosting ability.

4. Hacks and tricks like “nofollow” are often ineffective at shaping the flow of link equity.

Using rel=”no follow” or embedding a remotely executable JavaScript file that makes it so that browsers can see the links and visitors can, but Google is unlikely to see or follow those links, to shape the flow of your link equity is generally (a) a poor use of your time, because it doesn’t affect things that much. The old-school PageRank algorithm not that hugely important anymore. And (b) Google is often pretty good at interpreting and discounting these things. So it tends to not be worth your time at all.

5. Redirects and canonicalization lose a small amount of link equity. Non-ideal ones like 302s, JS redirects, etc. may lose more than 301, rel=canonical, etc.

So if I have a 301 or a rel=canonical from one page to another, those will lose or cost you a small, a very small amount of link equity. But more potentially costly would be using non-ideal types of redirects or canonicalization methods, like a JavaScript-based redirect or a 302 or a 307 instead of a 301. If you’re going to do a redirect or if you’re going to do canonicalization, 301s or rel=canonicals are the way to go.

So keeping in mind these principles, let’s talk through three of the most common link equity flow issues that we see websites facing.

Common link equity flow issues

A. A few pages on a large site get all the external links:

You have a relatively large site, let’s say thousands to tens of thousands, maybe even hundreds of thousands of pages, and only a few of those pages are earning any substantial quantity of external links. I have highlighted those in pink. So these pages are pointing to these pink ones. But on this website you have other pages, pages like these purple ones, where you essentially are wanting to earn link equity, because you know that you need to rank for these terms and pages that these purple ones are targeting, but they’re not getting the external links that these pink pages are. In these cases, it’s important to try a few things.

  1. We want to identify the most important non-link earning pages, these purple ones. We’ve got to figure out what these actually are. What are the pages that you wish would rank that are not yet ranking for their terms and phrases that they’re targeting?
  2. We want to optimize our internal links from these pink pages to these purple ones. So in an ideal world, we would say, “Aha, these pages are very strong. They’ve earned a lot of link equity.” You could use Open Site Explorer and look at Top Pages, or Ahrefs or any of our other competitors and look at your pages, the ones that have earned the most links and the most link equity. Then you could say, “Hey, can I find some relevance between these two or some user stories where someone who reaches this page needs something over here, and thus I’m going to create a link to and from there?” That’s a great way to pass equity.
  3. Retrofitting and republishing. So what I mean by this is essentially I’m going to take these pages, these purple ones that I want to be earning links, that are not doing well yet, and consider reworking their content, taking the lessons that I have learned from the pink pages, the ones that have earned link equity, that have earned external links and saying, “What did these guys do right that we haven’t done right on these guys, and what could we do to fix that situation?” Then I’m going to republish and restart a marketing, a link building campaign to try and get those links.

B. Only the homepage of a smaller site gets any external links.

This time we’re dealing with a small site, a very, very small site, 5 pages, 10 pages, maybe even up to 50 pages, but generally a very small site. Often a lot of small businesses, a lot of local businesses have this type of presence, and only the homepage gets any link equity at all. So what do we do in those cases? There’s not a whole lot to spread around. The homepage can only link to so many places. We have to serve users first. If we don’t, we’re definitely going to fall in the search engine rankings.

So in this case, where the pink link earner is the homepage, there are two things we can do:

  1. Make sure that the homepage is targeting and serves the most critical keyword targets. So we have some keyword targets that we know we want to go after. If there’s one phrase in particular that’s very important, rather than having the homepage target our brand, we could consider having the homepage target that specific query. Many times small businesses and small websites will make this mistake where they say, “Oh, our most important keyword, we’ll make that this page. We’ll try and rank it. We’ll link to it from the homepage.” That is generally not nearly as effective as making a homepage target that searcher intent. If it can fit with the user journey as well, that’s one of the best ways you can go.
  2. Consider some new pages for content, like essentially saying, “Hey, I recognize that these other pages, maybe they’re About and my Terms of Service and some of my products and services and whatnot, and they’re just not that link-worthy. They don’t deserve links. They’re not the type of pages that would naturally earn links.” So we might need to consider what are two or three types of pages or pages that we could produce, pieces of content that could earn those links, and think about it this way. You know who the people who are already linking to you are. It’s these folks. I have just made up some domains here. But the folks who are already linking to your homepage, those are likely to be the kinds of people who will link to your internal pages as well. So I would think about them as link targets and say, “What would I be pretty confident that they would link to, if only they knew that it existed on our website?” That’s going to give you a lot of success. Then I would check out some of our link building sections here on Whiteboard Friday and across the Moz Blog for more tips.

C. Mid-long tail KW-targeting pages are hidden or minimized by the site’s nav/IA.

So this is essentially where I have a large site, and I have pages that are targeting keywords that don’t get a ton of volume, but they’re still important. They could really boost the value that we get from our website, because they’re hyper-targeted to good customers for us. In this case, one of the challenges is they’re hidden by your information architecture. So your top-level navigation and maybe even your secondary-level navigation just doesn’t link to them. So they’re just buried deep down in the website, under a whole bunch of other stuff. In these cases, there are some really good solutions.

  1. Find semantic and user intent relationships. So semantic is these words appeared on those pages. Let’s say one of these pages here is targeting the word “toothpaste,” for example, and I find that, oh, you know what, this page over here, which is well linked to in our navigation, mentions the word “toothpaste,” but it doesn’t link over here yet. I’m going to go create those links. That’s a semantic relationship. A user intent relationship would be, hey, this page over here talks about oral health. Well, oral health and toothpaste are actually pretty relevant. Let me make sure that I can create that user journey, because I know that people who’ve read about oral health on our website probably also later want to read about toothpaste, at least some of them. So let’s make that relationship also happen between those two pages. That would be a user intent type of relationship. You’re going find those between your highly linked to external pages and your well-linked-to internal pages and these long tail pages that you’re trying to target. Then you’re going to create those new links.
  2. Try and leverage the top-level category pages that you already have. If you have a top-level navigation and it links to whatever it is — home, products, services, About Us, Contact, the usual types of things — it’s those pages that are extremely well linked to already internally where you can add in content links to those long-tail pages and potentially benefit.
  3. Consider new top-level or second-level pages. If you’re having trouble adding them to these pages, they already have too many links, there’s no user story that make good sense here, it’s too weird to jam them in, maybe engineering or your web dev team thinks that that’s ridiculous to try and jam those in there, consider creating new top-level pages. So essentially saying, “Hey, I want to add a page to our top-level navigation that is called whatever it is, Additional Resources or Resources for the Curious or whatever.” In this case in my oral health and dentistry example, potentially I want an oral health page that is linked to from the top-level navigation. Then you get to use that new top-level page to link down and flow the link equity to all these different pages that you care about and currently are getting buried in your navigation system.

All right, everyone. Hope you’ve enjoyed this edition of Whiteboard Friday. Give us your tips in the comments for how you’ve seen link equity flow, the benefits or drawbacks that you’ve seen to try and controlling and optimizing that flow. We’ll see again next week for another edition of Whiteboard Friday. Take care.

Video transcription by Speechpad.com

Sign up for The Moz Top 10, a semimonthly mailer updating you on the top ten hottest pieces of SEO news, tips, and rad links uncovered by the Moz team. Think of it as your exclusive digest of stuff you don’t have time to hunt down but want to read!

Pros and Cons of HTTPS Services: Traditional vs Let’s Encrypt vs Cloudflare

Posted by jrridley

If you have a website property verified in Google Search Console, and the website is not HTTPS-secured, you’ve likely seen some form of the following message in your dashboard recently:

After months of talk and speculation, Google has finally started to move forward with its plan to secure the web by enforcing HTTPS. Although HTTPS had previously only been a concern for e-commerce sites or sites with login functionality, this latest update affects significantly more sites. The vast majority of websites have a contact page (or something similar) that contains a contact or subscription form. Those forms almost always contain text input fields like the ones Google warns about in the message above. The “NOT SECURE” warning has already been appearing on insecure sites that collect payment information or passwords. It looks like this in a user’s URL bar:

Now that this warning will be displaying for a much larger percentage of the web, webmasters can’t put off an HTTPS implementation any longer. Unfortunately, Google’s advice to webmasters for solving this problem is about as vague and unhelpful as you might imagine:

Thanks, Google.

Implementing HTTPS is not a simple process. The Washington Post published a blog post outlining their 10-month HTTPS migration back in 2015, and numerous sites (including Moz) have reported experiencing major traffic fluctuations following their migrations. The time and resources required to migrate to HTTPS are no minor investment; we’re talking about a substantial website overhaul. In spite of these obstacles, Google has shown little sympathy for the plight of webmasters:

http://platform.twitter.com/widgets.js

Google’s singular focus in this area is to provide a better user experience to web visitors by improving Internet security. On its surface, there’s nothing wrong with this movement. However, Google’s blatant disregard for the complexities this creates for webmasters leaves a less-than-pleasant taste in my mouth, despite their good intentions.

Luckily, there’s a bit of a silver lining to these HTTPS concerns. Over the last few years, we’ve worked with a number of different clients to implement HTTPS on their sites using a variety of different methods. Each experience was unique and presented its own set of challenges and obstacles. In a previous post, I wrote about the steps to take before, during, and after a migration based on our experience. In this post, my focus is instead on highlighting the pros and cons of various HTTPS services, including non-traditional implementations.

Here are the three methods we’ve worked with for our clients:

  1. Traditional HTTPS implementation
  2. Let’s Encrypt
  3. Cloudflare


Method 1: Traditional HTTPS implementation

A traditional HTTPS implementation starts with purchasing an SSL certificate from a trusted provider, like Digicert or GeoTrust (hint: if a site selling SSL certificates is not HTTPS-secured, don’t buy from them!). After that, you’ll need to verify the certificate with the Certificate Authority you purchased it from through a Certificate Signing Request (CSR); this just proves that you do manage the site you claim to be managing. At this point, your SSL certificate will be validated, but you’ll still have to implement it across your site. Namecheap has a great article about installing SSL certificates depending on your server type. Once that SSL certificate has been installed, your site will be secured, and you can take additional steps to enable HSTS or forced HTTPS rewrites at this point.

Pros

  1. Complete security. With a fully validated SSL certificate installed on your root server, there is no possibility of having a compromised connection between your server and site, or between your site and the site visitor.
  2. Customizable. One of the features of a full SSL implementation is that you can purchase an Extended Validation (EV) SSL certificate. This not only provides your green padlock in the browser bar, but also includes your company name to provide further assurance to visitors that your site is safe and secure.
  3. Easier to implement across multiple subdomains. If you have multiple subdomains, what you’ll likely need for your HTTPS implementation is either a separate SSL certificate for each subdomain or a wildcard certificate for all variations of your domain. A traditional SSL service is often the easiest way to set up a wildcard certificate if you need to secure several variations.

Cons

  1. Expensive. Though basic SSL certificates may be available for as little as $150, depending on the complexity of your site, these costs can quickly increase to several thousand dollars if you need more advanced security features, a better CDN network, etc. This also doesn’t include the cost of having developers implement the SSL certificate, which can be extensive as well.
  2. Time to implement. As mentioned above, it took the Washington Post 10 months to complete their HTTPS migration. Other companies have reported similar timeframes, especially for larger, more complex websites. It’s very hard to know in advance what kinds of issues you’ll have to resolve with your site configuration, what kinds of mixed content you may run into, etc., so plan lots of extra time to address these issues if you go with a standard implementation.


Method 2: Let’s Encrypt

Let’s Encrypt is a free nonprofit service provided by the Internet Security Research Group to promote web security by providing free SSL certificates. Implementing Let’s Encrypt is very similar to a traditional HTTPS implementation: You still need to validate the Certificate Authority, install the SSL certificate on your server, then enable HSTS or Forced HTTPS rewrites. However, implementing Let’s Encrypt is often much simpler through the help of services like Certbot, which will provide the implementation code needed for your particular software and server configuration.

Pros

  1. Free. The cost is zero, zippo, nada. No fine print or hidden details.
  2. Ease of implementation. Let’s Encrypt SSL is often much simpler to implement on your site than a traditional HTTPS implementation. Although not quite as simple as Cloudflare (see below), this ease of implementation can solve a lot of technical hurdles for people looking to install an SSL certificate.
  3. Complete security. Like with a traditional HTTPS implementation, the entire connection between site visitor and site server is secure, leaving no possibility of a compromised connection.

Cons

  1. Compatibility issues. Let’s Encrypt is known to be incompatible with a few different platforms, though the ones it is incompatible with are not likely to be a major source of traffic to your site (Blackberry, Nintendo 3DS, etc.).
  2. 90-day certificates. While traditional SSL certificates are often valid for a year or more, Let’s Encrypt certificates are only valid for 90 days, and they recommend renewing every 60 days. Forgetting to renew your certificate with this necessary frequency could put your site in a compromising situation.
  3. Limited customization. Let’s Encrypt will only offer Domain Validation certificates, meaning that you can’t purchase a certificate to get that EV green bar SSL certificate. Also, Let’s Encrypt does not currently offer wildcard certificates to secure all of your subdomains, though they’ve announced this will be rolling out in January 2018.

Method 3: Cloudflare

This is one of my favorite HTTPS implementations, simply because of how easy it is to enable. Cloudflare offers a Flexible SSL service, which removes almost all of the hassle of implementing an SSL certificate directly on your site. Instead, Cloudflare will host a cached version of your site on their servers and secure the connection to the site visitors through their own SSL protection. You can see what this looks like in the picture below:

In doing so, Cloudflare makes this process about as simple as you can ask for. All you have to do is update your DNS records to point to Cloudflare’s nameservers. Boom, done. And as with Let’s Encrypt, the process is entirely free.

Pros

  1. Free. The cost is zero, zippo, nada. No fine print or hidden details. Cloudflare does offer more advanced features if you upgrade to one of their paid plans, but the base SSL service comes completely free.
  2. Easiest implementation. As I mentioned above, all that’s required for implementing Cloudflare’s SSL service is creating an account and updating your DNS records. There’s no update to the server configuration and no time spent trying to resolve additional configuration issues. Additionally, implementing HSTS and forced HTTPS rewrites can be done directly through the Cloudflare dashboard, so there’s really almost no work involved on your end.
  3. PageSpeed optimizations. In addition to SSL security, Cloudflare’s HTTPS implementation also provides several additional services that can preserve PageSpeed scores and page load times. While a traditional HTTPS implementation (or Let’s Encrypt) can often have negative consequences for your site’s page load times, Cloudflare offers the ability to auto-minify JS, CSS, and HTML; Accelerated Mobile Pages (AMP); and a Rocket loader for faster JS load times. All of these features (along with Cloudflare serving a cached version of your site to visitors) will help prevent any increase in page load times on your site.

Cons

  1. Incomplete encryption. As you can see in the picture above, Cloudflare encrypts the connection between the visitor and the cached version of your site on Cloudflare, but it doesn’t encrypt the connection between your site and your server. While this means that site visitors can feel secure while visiting your site, there is still the chance that your server connection will be compromised. While you can upgrade to a full SSL implementation that does enable this setup, that is not part of the free service.
  2. Security concerns. Cloudflare was infamously hacked earlier this year, exposing lots of sensitive user information. While it appears they have resolved and tightened security since then, it’s still important to be aware of this development.
  3. Lack of customization. Like with Let’s Encrypt, Cloudflare’s free SSL service doesn’t provide any kind of EV green bar SSL for your site. While you can upgrade to full SSL which does provide this functionality, the service is no longer free at that point.

Which type of HTTPS implementation is best?

It really depends on your site. Smaller sites who just need enough security that Google won’t punish the site in Chrome can likely use Cloudflare. The same goes for agencies providing HTTPS recommendations to clients where you don’t have development control of the site. On the other hand, major e-commerce or publication sites are going to want a fully customized HTTPS implementation through traditional means (or via Let’s Encrypt’s wildcard certificate, when that happens next year). Ultimately, you’ll have to decide which implementation makes the most sense for your situation.

Sign up for The Moz Top 10, a semimonthly mailer updating you on the top ten hottest pieces of SEO news, tips, and rad links uncovered by the Moz team. Think of it as your exclusive digest of stuff you don’t have time to hunt down but want to read!